







How to Draw a Monkey (Rhesus Macaque) VIDEO & Step-by-Step Pictures
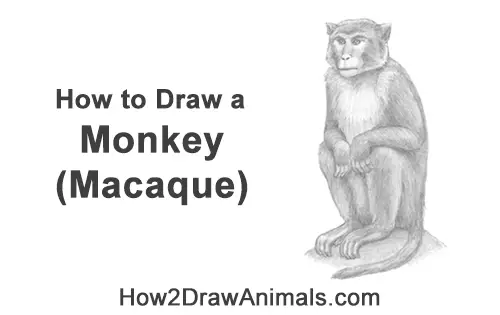
In this free art lesson, you'll learn how to draw a Rhesus Macaque Monkey step-by-step.
Stay tuned for more free drawing lessons by:
Liking us on Facebook>>
Subscribing on YouTube.com>>
Following us on Instagram>>
All of the tutorials on How2DrawAnimals.com are good drawing tutorials for beginners and experienced artists alike. The online tutorials are easy to follow; they teach you the how to draw basics while showing you how to draw animals step by step. Each animal has a video drawing tutorial option, as well as step-by-step photos and written text to follow.
RELATED TUTORIALS
 |
 |
 |
To draw this Macaque step by step, follow along with the video tutorial below and pause the video after each step to draw at your own pace. You may find it easier to follow the step-by-step drawings below the video. The new lines in each step are shown in red, so you'll know exactly what to draw next. You may want to open the video in a new tab and use both drawing methods. Take your time and draw at your own pace.
Below you can watch a Narrated step-by-step video tutorial:
For the first few steps, don't press down too hard with your pencil. Use light, smooth strokes to begin.
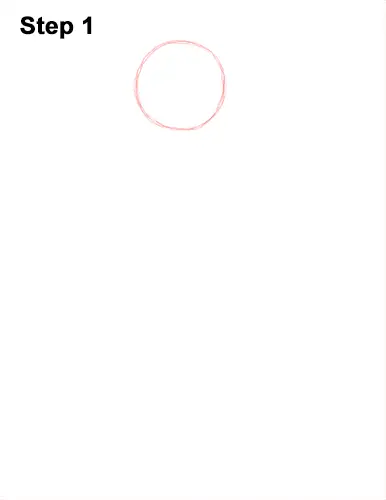
Step 1: Start by drawing a circle as a guide for the rhesus macaque's head. To draw the circle, first make four marks to determine its height and width. Then connect the marks using curved lines. If you're struggling to draw the circle, just trace the outer rim of a circular object like a coin or a bottle cap. For a more detailed guide on the different ways to draw a circle check out this tutorial: Four simple ways to draw a circle.

Step 2: Draw a curved, horizontal line across the head as a construction guide to help you place the macaque's facial features later. Draw a short, curved, vertical line on the top, left side for another guide.
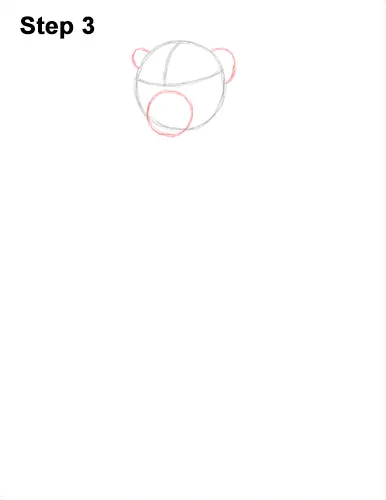
Step 3: Under the horizontal guide, draw a small circle as a guide for the monkey's muzzle. Pay attention to the size of this circle in relation to the head circle. The bottom edge of this circle should be outside of the edge of the head circle. On top of the head, on the sides, draw two small arcs as guides for the ears. The arc on the left should be smaller because the head is slightly turned.
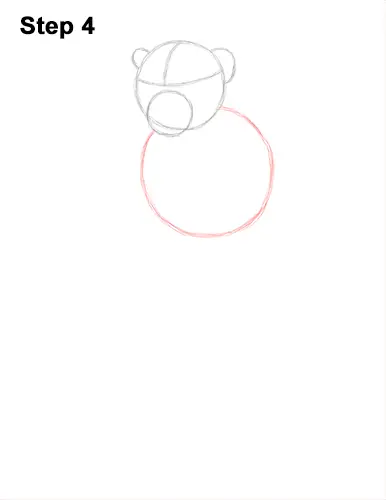
Step 4: On the lower, right side of the head, draw a big circle as a guide for the top part of the macaque's body. To draw the circle, first make three small marks to indicate the sides of the circle. The top mark is unnecessary because the head is in the way. Then connect the marks using curved lines to finish the shape of the circle. The body circle should be almost twice the size of the head circle.
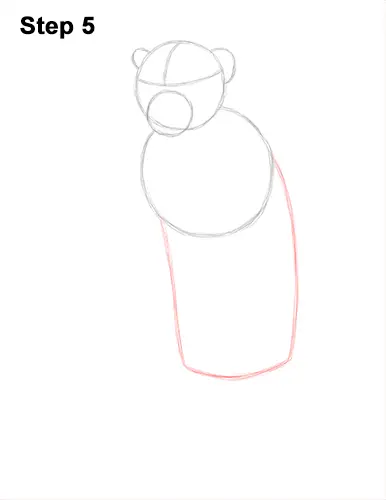
Step 5: Below the body circle, draw a big, rectangular shape as a guide for the bottom half of the monkey's body. The sides of this guide are made up of long, curved vertical lines. The bottom edge is made up of a shorter, curved horizontal line. Draw this shape slightly to the right of where the head is.
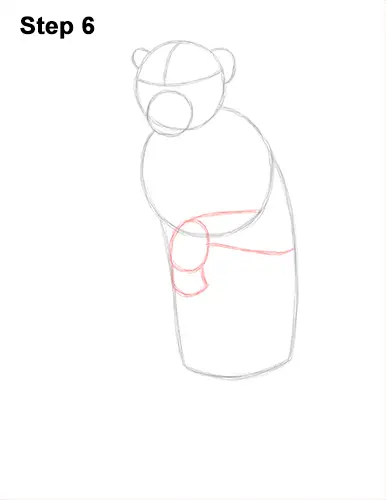
Step 6: On the lower, left side of the body circle, draw a small oval as a guide for the macaque's hand. This oval should be small and it should overlap the edge of the body circle. Below the oval, draw a small, curved shape as a guide for the fingers. This small shape should be similar to an angled letter U. To the left of the oval, draw two long, horizontal lines as guides for the forearm. Make the bottom line longer and more curved than the top line.
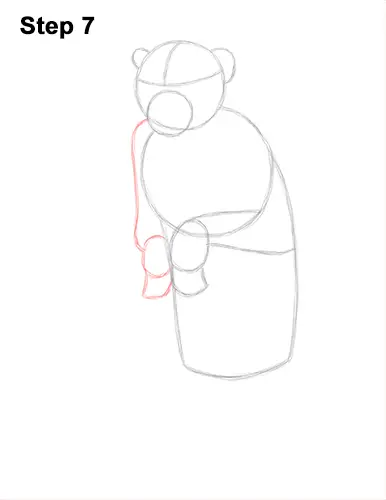
Step 7: On the left side of the body, draw a small oval as a guide for the rhesus macaque's other hand. This oval should be smaller than the other hand oval because the body is slightly turned. Under the oval, draw an angled shape as a guide for the fingers. Draw a line from the oval to the head as a guide for the rest of the arm and shoulder.
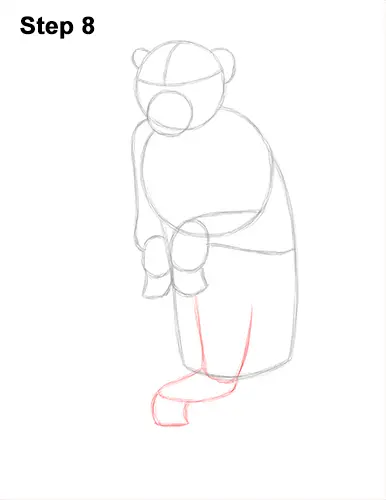
Step 8: On the lower, left side of the body, draw two long, vertical lines as guides for the monkey's first leg. Make the shape of the leg wide at the top and thinner at the bottom. On the bottom of the leg, draw a line that curves to the left as a guide for the foot. Below the tip of the foot, draw a small, square-like shape as a guide for the long toes.
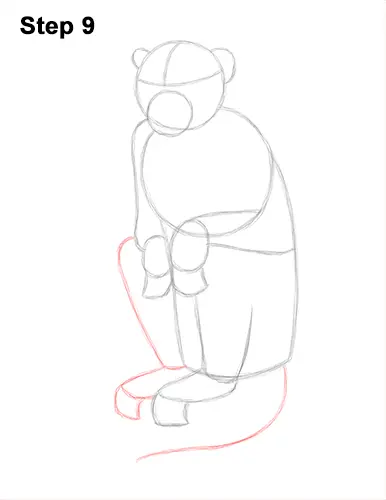
Step 9: To the left of the first leg, draw the guides for the macaque's other leg and foot. Draw a line from the left arm to the bottom of the body as a guide for the folded leg. At the bottom, draw a line that curves to the left as a guide for the foot. Below the tip of the foot, draw a small curved shape as a guide for the toes.
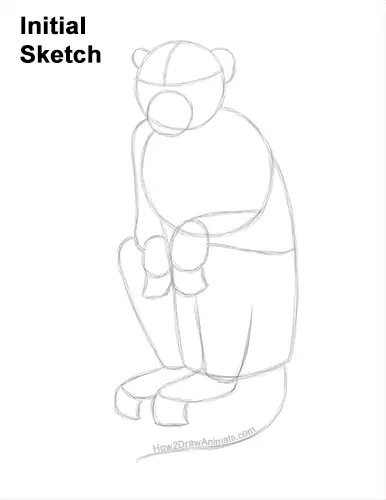
That's it for the guides! From this point on, press down harder with your pencil for a more defined drawing.
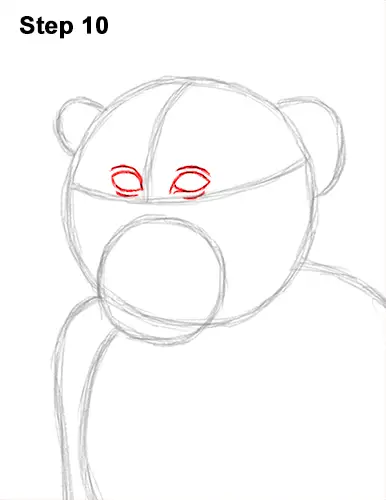
Step 10: Inside the head, on top of the horizontal construction guide, lightly sketch two small ovals for the macaque's eyes. Place the eyes on either side of the vertical construction guide. Don't place the eyes too far away from each other. When you get the size and position of the eyes right, darken the shapes but make the side pointier for the corners of the eyes. Draw a couple of short, curved lines around the eyes for the eyelids and wrinkles.
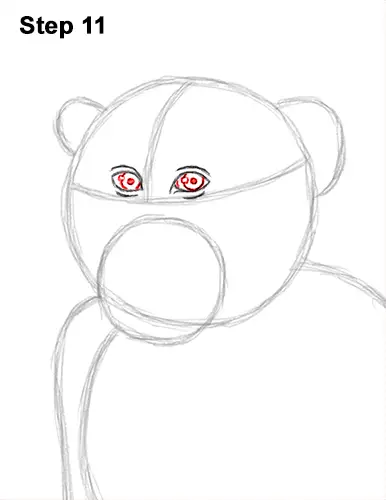
Step 11: Inside the monkey's eyes, draw tiny circles for highlights. Add bigger circles for the irises but don't overlap the tiny highlight circles. The circles for the irises are basically made up of short, curved lines. In the middle of each iris, draw a big dot for the pupils.
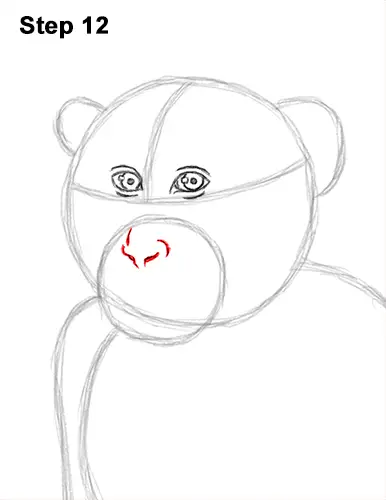
Step 12: Inside the circle for the muzzle, at the top, draw a series of short lines for the rhesus macaque's nose. The bottom lines should form a shape that similar to the letter V. Make the bottom lines thicker and darker for the nostrils. Use a short, curved line on the right side for the outer edge of the nostril.
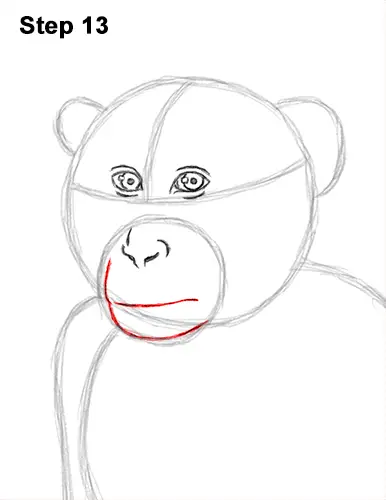
Step 13: Far down below the nose, draw a horizontal line for the macaque's mouth. The mouth should be close to the lower edge of the big head circle. Follow the basic path of the smaller circle to complete the side of the muzzle. Darken the lower edge of the guide to create the chin under the mouth.
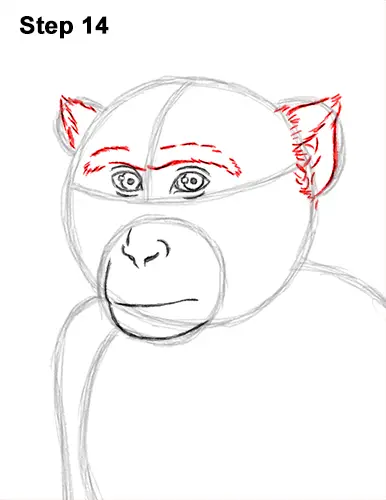
Step 14: Use the small arcs on the sides of the head as guides to draw the monkey's ears. Darken the basic path of the guides using short strokes to create the furry shapes of the ears. Make the tops of the ears pointier than the initial arcs. Within the shapes, draw more lines and strokes for the furry ear openings and the inner ear structures. Above the eyes draw curved lines that are made up of short strokes for the thick, furry eyebrow.
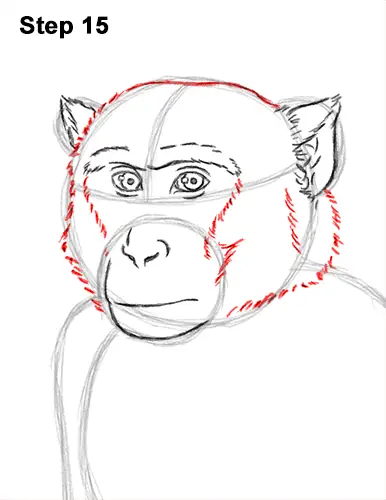
Step 15: Use the initial circle as a guide to draw the rest of the macaque's head. Darken the basic shape of the circle using short strokes to create the furry shape of the head. Use a wavier line for the top part of the head. Make the right side of the head wider than the initial circle. Add a few short strokes below the sides of the brow to create the section that separates the fur form the more bare center of the face.
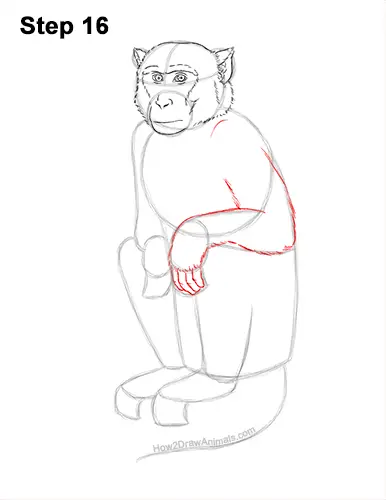
Step 16: Use the shapes in the middle of the body as guides to draw the rhesus macaque's first arm and hand. Darken the horizontal lines to create the forearm but make the bottom line wavier. Use a series of short strokes as you darken the shapes to create a furry texture. Add a couple of lines at the top to create the top part of the arm. Darken the side of the small oval using short strokes to create the hand. Draw a series of short, angled lines inside the small shape at the bottom to separate the fingers. Bend the fingers slightly to the right. The fingers on the sides should be smaller than the fingers in the middle. Add a few short lines across the middle of the fingers for wrinkles on the joints.
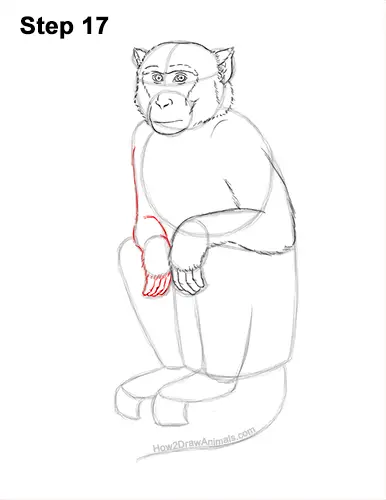
Step 17: Use the shapes of the left as guides to draw the monkey's other arm and hand the same way. Darken the top guides to create the arm. Add short strokes along the bottom of the small oval for the fur on the knuckles. Below the knuckles, draw a series of lines that angle to he left to separate the fingers. Draw the fingers within the shape of the square-like guide.
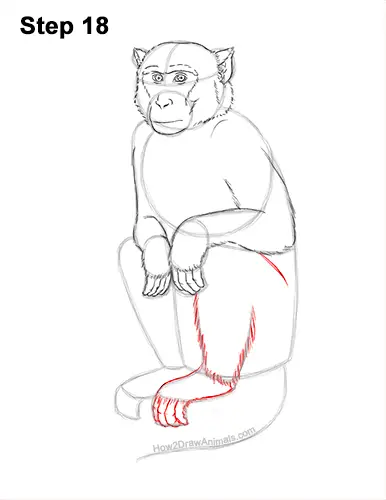
Step 18: Use the shapes and lines that are under the arm on the right as guides to draw the macaque's first leg and foot. Darken the sides of the long lines using short strokes to create the shape of the furry leg. On the top, right, draw a curved line for the folded leg. Darken the curved shape at the bottom for the foot. Draw a series of angled lines inside the small, square-like shape to separate the long toes. Just like the fingers at the top, curved the shapes of the toes to the right. Add a few angled lines across the middle for the wrinkles on the joints.
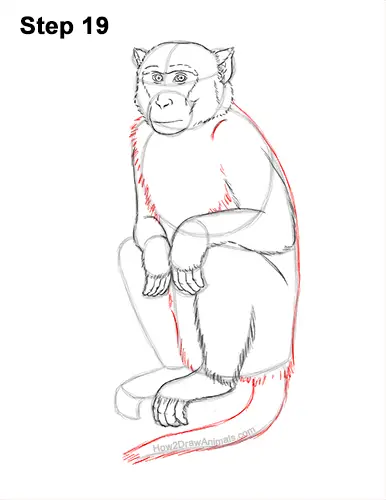
Step 19: Use the rest of the lines and shape in the middle as guides to draw the rest of the macaque's body. Darken the sides of the guides using short, strokes to create the furry body. Don't overlap the shapes from previous steps as you draw the body. Darken the line at the bottom for the tail. Add another curved line at the top for the top edge of the tail. Rhesus macaques have short tails so don't make this shape too long.
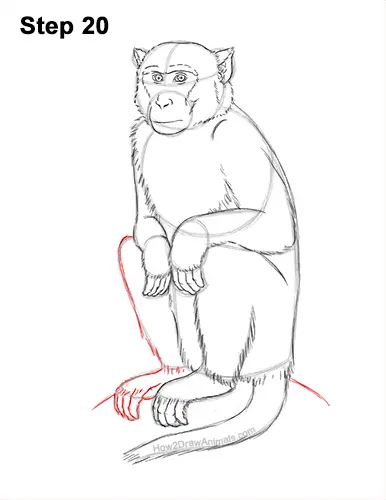
Step 20: Use the shapes on the lower, left side as guides to draw the monkey's other leg and foot. Use short strokes to darken the top line to create the furry leg. On the lower, right side of the foot, draw a short, curved shape for the thumb-like toe. Within the small, square-like guide at the bottom, draw a series of short, angled lines to separate the toes. Under the body, on the sides, draw a couple of sloping lines so that the macaque has something to sit on.
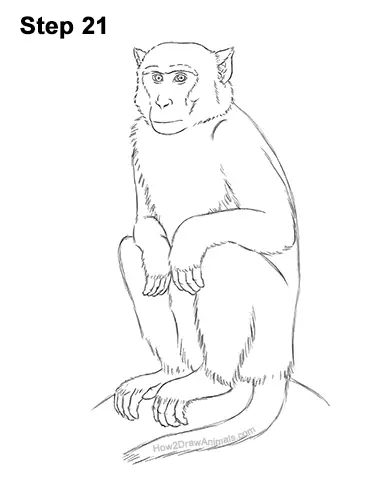
Step 21: For a cleaner look, erase as much as you can of the initial guide lines. Don't worry about erasing all of the guides. It's okay to leave some behind. Re-draw any final sketch lines you may have accidentally erased.
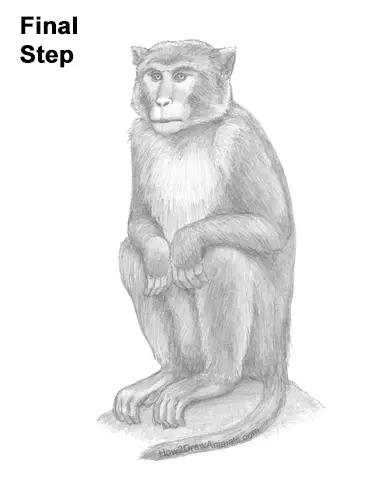
Final Step: Shade your macaque drawing for extra detail. Shade lightly at first and gradually build up to darker values. For light values, push down very lightly on your pencil and push down harder for darker values. As you shade the body, use strokes that go in the general direction of the fur. The strokes on the head should radiate out from the middle while the strokes on the body should be mainly vertical. Use a smoother and lighter value on the bare section of the face. Use a light value for the fur on the chest too. As you shade, separate each stroke a bit so that the white of the paper comes through and creates a more furry texture. Use a dark value for the inside of the eyes and a light value for the irises.
Add a darker value throughout the body to create shadows. Pick a light source as you shade so that the shadows are consistent. Here the light source is coming from the top, so most of the shadows are on the underside of the shapes. It's a good idea to use reference as you shade for a more accurate depiction of a rhesus macaque monkey. Shading can be time-consuming, so be patient and take breaks. For a more detailed guide on how to shade, check out this tutorial: How to shade.
Thanks for visiting! Subscribe to the How2DrawAnimals YouTube Channel for a new tutorial every week.
To learn how to draw popular cartoon characters, visit EasyDrawingTutorials.com.
To learn how to draw Manga, visit How2DrawManga.com.
RELATED TUTORIALS
|
 |
|