







How to Draw a Vulture (Cartoon) VIDEO & Step-by-Step Pictures
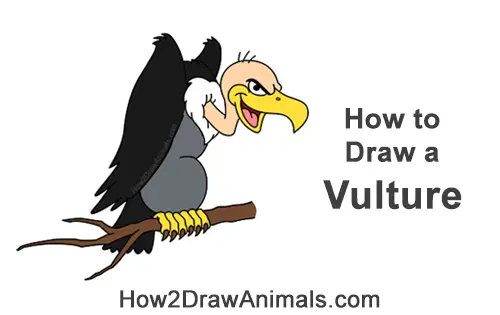
In this free art lesson, you'll learn how to draw a cartoon Vulture.
Stay tooned for more free drawing lessons by:
Liking us on Facebook>>
Subscribing on YouTube.com>>
Following us on Instagram>>
RELATED TUTORIALS
 |
 |
 |
To draw this cartoon Vulture step by step, follow along with the video tutorial below and pause the video after each step to draw at your own pace. You may find it easier to follow the step-by-step drawings below the video. The new lines in each step are shown in red, so you'll know exactly what to draw next. You may want to open the video in a new tab and use both drawing methods. Take your time and draw at your own pace.
Written step-by-step video tutorial:
For the first few steps, don't press down too hard with your pencil. Use light, smooth strokes to begin.
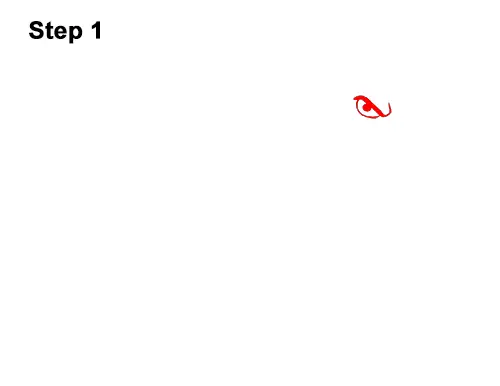
Step 1: Draw a short line that slopes to the lower, right side for the vulture's eyebrow. When you get the shape of the line right, make it thicker for a bushier eyebrow. Curve the lower, right tip upward to furrow the eyebrow more. Directly under the eyebrow, draw a curved line for the lower edge of the bird's eye. Inside the eye, at the top, draw a small circle and shade it in for the pupil.
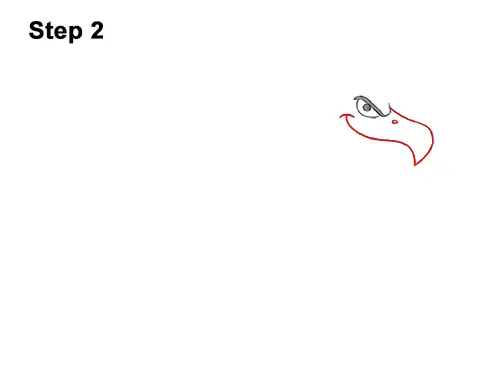
Step 2: From the eyebrow, draw a long line that curves to the right and then downward for the top part of the bird's beak. Sketch lightly at first so that you get the line right. You can make the line even longer for a bigger beak. Below that, draw a wavy line that curves up toward the eye for the rest of the top beak. Make the right side pointy. Draw a shorter, curved line on the right tip for a smile line. Add a small circle within the shape for the vulture's nostril.
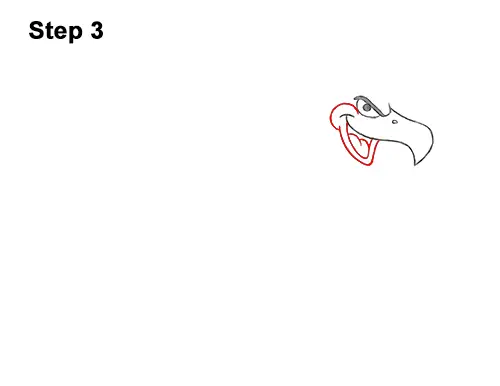
Step 3: To the right of the smile, draw a curved line for the "cheek" portion of the vulture's beak. Below the smile, draw a V-shaped line for the open mouth. Curve the sides a bit and make the bottom tip rounder. Inside the mouth, draw a smaller V-shaped line for the open mouth's inner edge. Inside the bird's open mouth, draw two short, curved lines for the tongue.
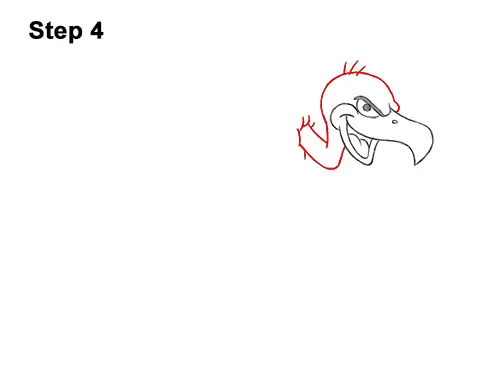
Step 4: Draw a long, curved line around the bird's face for the top part of the head. Don't draw the line too far away from the eye, otherwise the head will be too big and bulbous. On top of the vulture's head, draw three short lines for a bit of hair on the otherwise bald head. To the left of the beak, draw two lines that angle to the left for the bent neck. The left side of the neck should bend up a little. Close off the left side of the neck using short, curved lines.
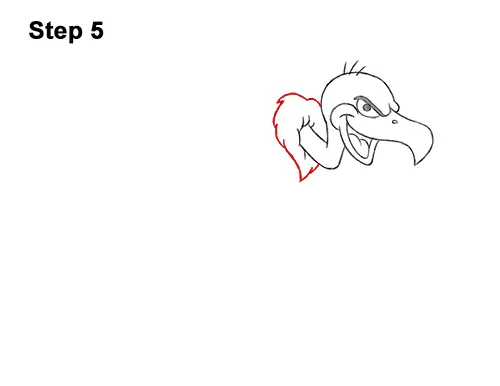
Step 5: Draw a series of short strokes around the vulture's neck for the feathery base. The overall shape of the feathery base should be similar to a heart that's made up of curved and jagged lines.
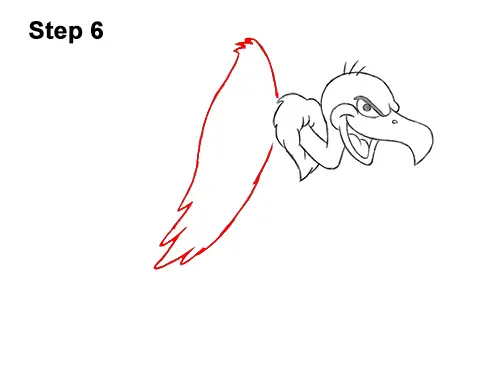
Step 6: Next to the neck base, draw a line that curves up and then down for the first part of the vulture's folded wing. Use jagged lines at the top for feathers. Extend the line on the left downward for the outer edge of the folded wing. At the bottom, draw a series of long, curved lines for the individual feathers. Make the bottom pointy. Curve the line on the right up toward the neck for the inner edge of the bird's folded wing.
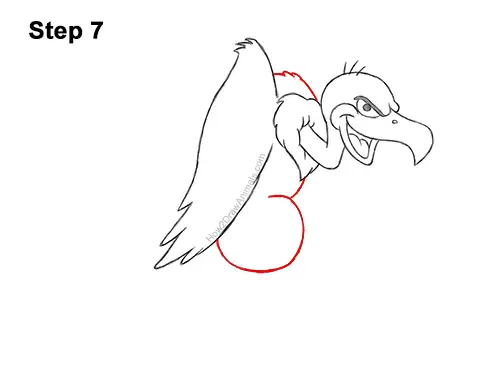
Step 7: At the top, draw a curved line from the head to the vulture's wing for a hump on the back. At the bottom, draw a big, circular shape for the lower half of the bird's body and belly.
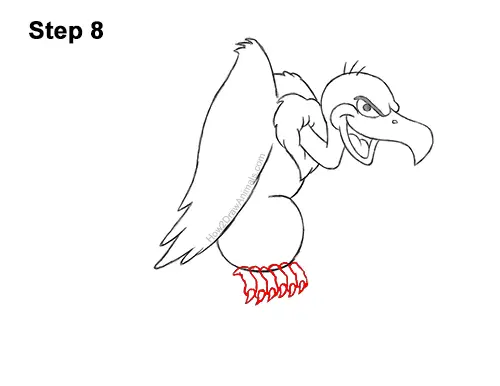
Step 8: Under the belly, draw the short, curved lines for the first toes. It's okay to overlap the line for the belly. On the bottom of each toe, draw a small, pointy, triangular shape for the vulture's sharp talons. Close off the toe shape on the left. Close off the toe shape on the left. On the right, draw three more curved lines for the bird's other toes. On the bottom of each toe, draw a pointy, triangular shape for the talons. The talons should be round at the top.
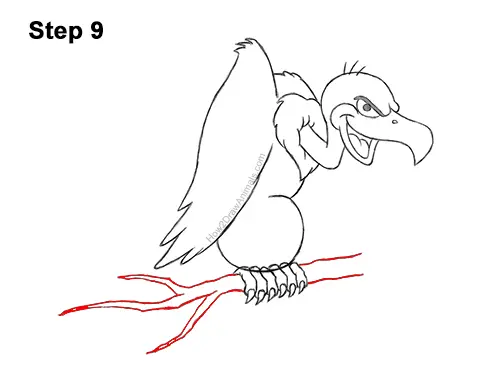
Step 9: To the left of the toes, draw three thin, long, pointy shapes to give the vulture a branch to stand on. The branch doesn't have to be perfect. It looks better if it's misshapen and jagged. Just make the tips thin and pointy. You can also add more branches if you'd like. To the right, draw a couple more lines for the branch's base.
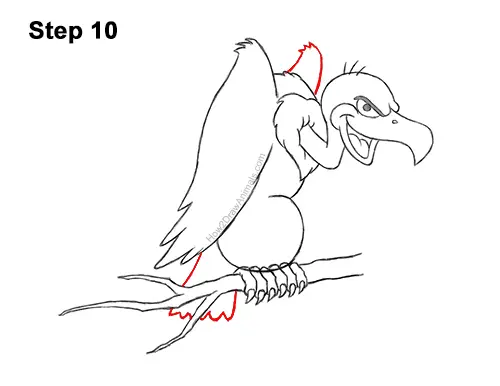
Step 10: On top of the back, draw a thin, curved shape for the vulture's other wing. Use jagged shapes for feathers. On the bottom, left side, draw a big, square-like shape with a jagged bottom for the bird's tail. Don't overlap the branch.
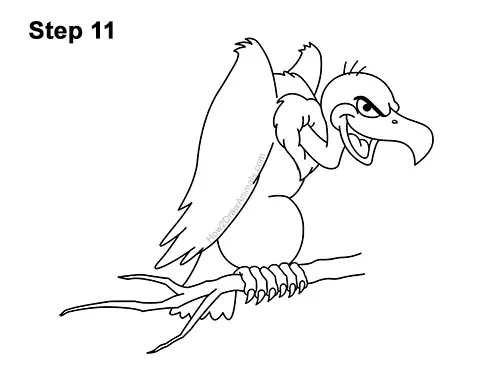
Step 11: Go over the lines with a pen or marker to make your vulture drawing permanent. Take your time and be careful when you ink to avoid any accidents. After the ink dries, get rid of every pencil mark with an eraser.
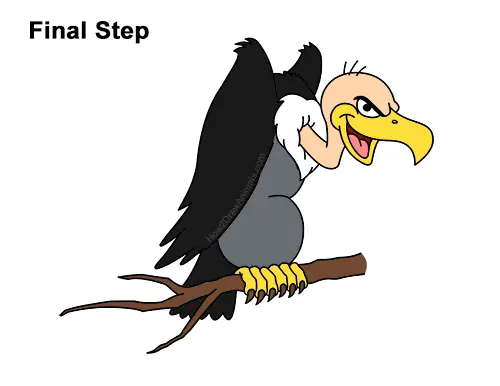
Final Step: Color your vulture drawing using color pencils, markers or crayons! Use peach or pink for the head. Use yellow for the beak and feet and black for the wings, back and tail. Color the front part of the bird's body gray. Use dark red for the inside of the mouth and pink for the tongue. Use brown for the talons and branch. Don't forget to pause the video to draw at your own pace.
Thanks for visiting! Subscribe to the How2DrawAnimals YouTube Channel for a new tutorial every week.
To learn how to draw popular cartoon characters, visit EasyDrawingTutorials.com.
RELATED TUTORIALS
|
|
|