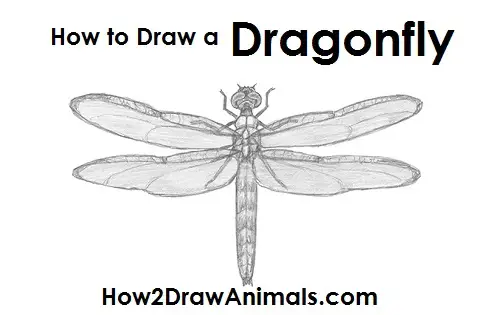
Please PAUSE the "How to Draw a Dragonfly" video after each step to draw at your own pace.
For the first few steps, don't press down too hard with your pencil. Use light, smooth strokes to begin.

Step 1: Draw a small circle as a guide for the dragonfly's head. The circle doesn't have to be perfect. It's just a guide.
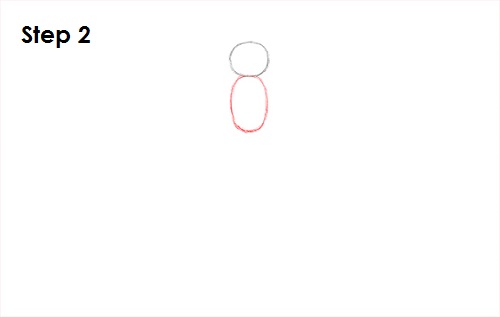
Step 2: Draw an oval under the head for dragonfly's midsection or thorax. The thorax should be almost twice as tall as the head and a bit thinner than the head.
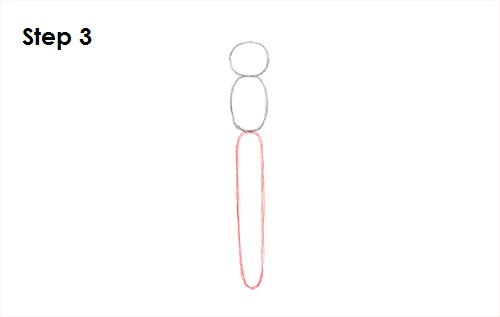
Step 3: Under the thorax, draw a very long oval-like shape as a guide for the dragonfly's abdomen. The abdomen should be about three times as tall as the thorax and should be skinnier than the thorax.
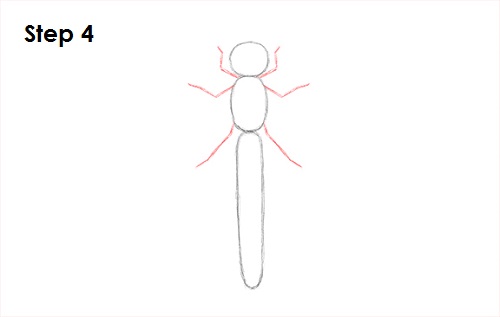
Step 4: Draw the dragonfly's leg guides using a series of lines on the sides of the thorax. The first pair of legs are near the top of the thorax pointing up. Bend the lines to indicate the joints. The second pair of legs are right below the first, and they point to the sides more. They are similar to wide letter V's. The third and final pair of legs are closer to the bottom of the thorax, and they point downward.
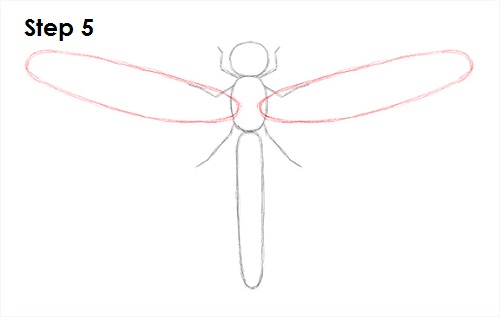
Step 5: Draw two long oval-like shapes on the sides of the thorax as guides for the first pair of dragonfly wings. Sketch lightly at first to get the shape of the guide right. Notice that the dragonfly wing guide has a diagonal orientation and is not strictly horizontal. Draw the guide for the other front wing on the right side the same way. Try to draw both sides similarly so your drawing has symmetry.
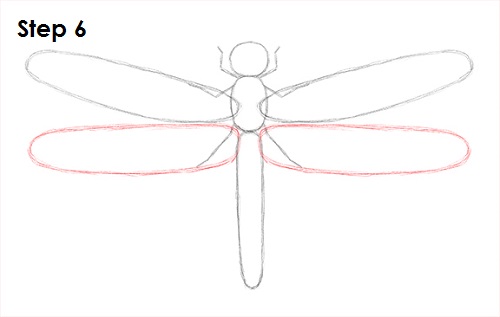
Step 6: Draw two more long oval-shaped circles below the first set as guides for the second pair of dragonfly wings. The length of the two sets of guides should be about the same. Sketch lightly at first to get the dragonfly wing shape right. The orientation of the guides at the bottom is not quite as diagonal but still has a slight tilt downward. The guides for the lower set of dragonfly wings are also lower than the thorax, and their edges don't touch.
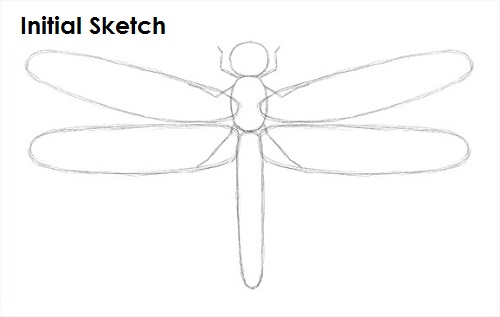
That's it for the initial sketch! From this point on, press harder with your pencil to get a more defined sketch.
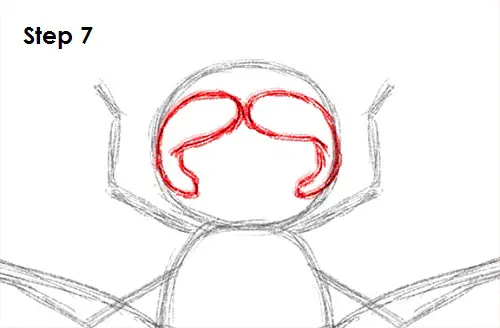
Step 7: Learn how to draw the dragonfly's eyes inside the original circle. First draw two arcs facing each other near the top of the head. Sketch lightly at first to get the shape right. Now curve the shape of the arc down to make it longer. Use the sides of the original circle as a guide. Now curve the shape of the arc down to make it longer. Use the sides of the circle as a guide. Dragonflies have compound eyes that wrap around the head, so bend the shape of the eyes appropriately.
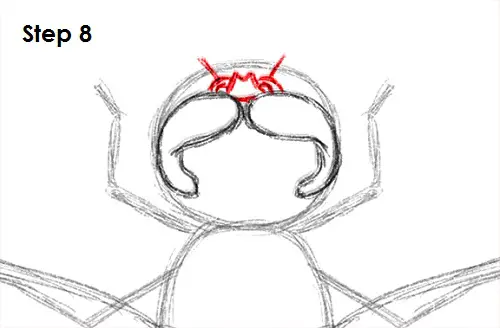
Step 8: Now learn how to draw the dragonfly's mouth parts on the front of the head. First draw an M-shaped line in front, then curved lines on the sides for the jaw. Then add tiny lines for antennas.
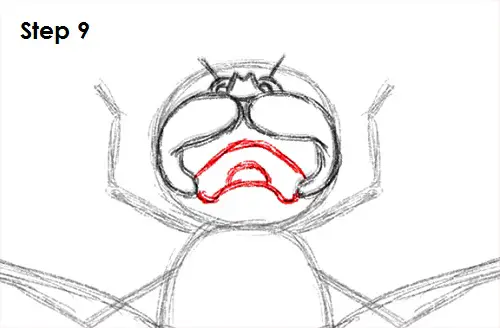
Step 9: Draw a series of curved lines in between the eyes for the back of the dragonfly's head.
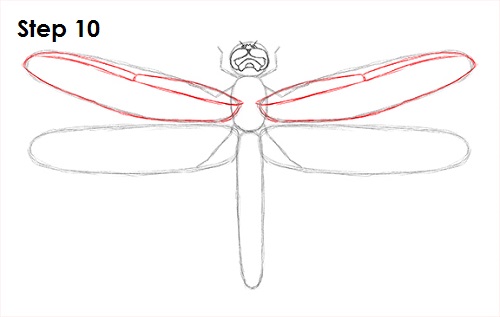
Step 10: Use the top set of the oval-like shapes as guides to draw the dragonfly's front pair of wings. Follow the basic path of the guide as you darken the line that makes up the wing. Dip the line a bit near the middle of the wing and make the tip pointier. Make the right side of the wing pointier to show where it connects to the thorax. Draw a few lines near the top part of the dragonfly's wing as the detail for the wings. Now tighten the shape of the front wing on the right side the same way. Darken the line to create the wing as you follow the basic path of the guide. Draw the lines inside the wing too. Remember to try to draw each side the same for a sense of symmetry.
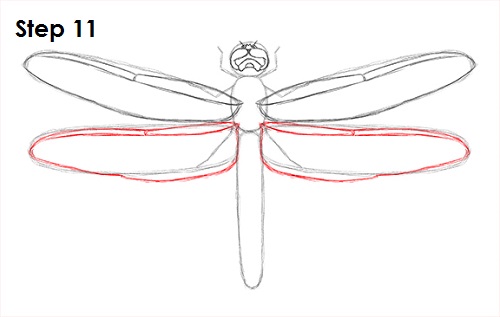
Step 11: Use the second set of oval-like shapes as guides to draw the dragonfly's hindwings. Make the top right end of the wing pointier and connect the point to the thorax. Follow the basic path of the oval-like shape as you darken the line for the wing. The hindwings should be a bit wider than the forewings. Add a few lines inside the wing near the top part for the wings. Draw the hindwing on the right using the same technique. Use the initial shape as a guide as you darken the lines and remember to make the width thicker. Draw the veins near the top.
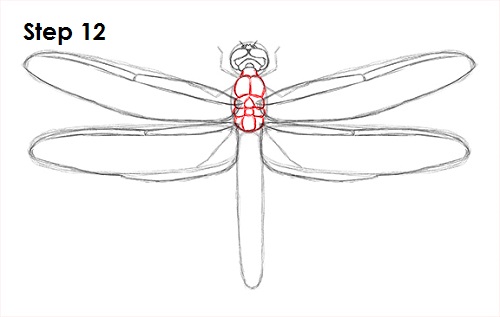
Step 12: Use the oval under the head as a guide to draw the dragonfly's thorax. Draw a curved line at the top to connect the thorax to the head. Draw a line down the middle of the thorax for detail. Add a few shapes down the middle of the thorax as the detail on the segments. Add more lines on the sides of the oval to finish the detail on the thorax.
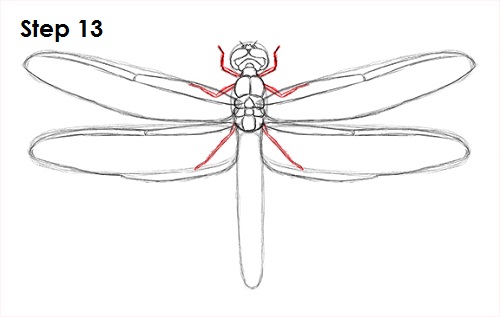
Step 13: Use the lines on the sides of the body as guides to draw the dragonfly's legs. Follow the path of the lines and make the legs thicker and darker. Even though the legs are under the wings, they are still visible because the wings are very transparent.
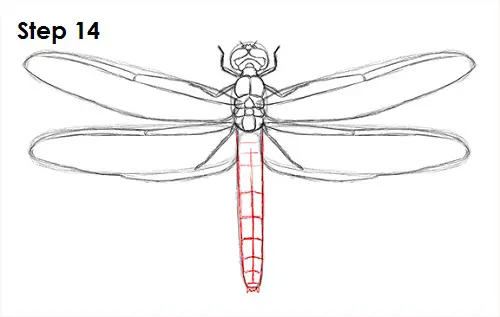
Step 14: Use the long oval at the bottom as a guide when drawing the dragonfly's abdomen. Darken the outside of the shape and add a line across the middle for detail. Lightly draw a few more lines within the shape of the abdomen as extra detail.
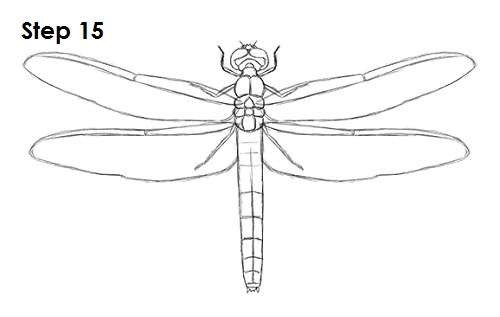
Step 15 (optional): For a cleaner look, erase as much as you can of the initial guide lines. Don't worry about erasing all of them. It's okay to leave some behind. Re-draw any final sketch lines that you may have accidentally erased.
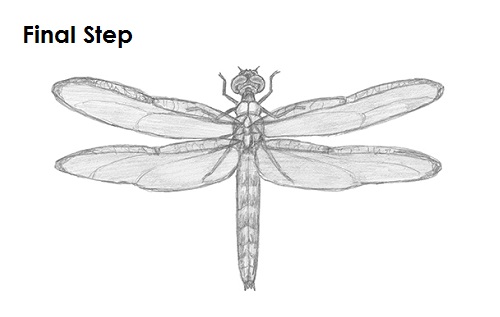
Final Step (optional): Add some value throughout your dragonfly drawing for extra detail. Vary the pressure on your pencil to get different degrees of tonal value. Try to add the value smoothly for a sleek feel instead of a rough texture. Don't forget to pause the video to draw at your own pace. Add some lines and value at the tips of the dragonfly's wings. It's always a good idea to use reference for accuracy. Draw a few more lines in the dragonfly's wings for more veins. Even though the wings are transparent, you can still add some value.
Thanks for watching! Subscribe to the
How2DrawAnimals YouTube Channel for a new tutorial every Tuesday.
To learn how to draw popular cartoon characters, visit
EasyDrawingTutorials.com.







