







How to Draw a Blue Jay VIDEO & Step-by-Step Pictures
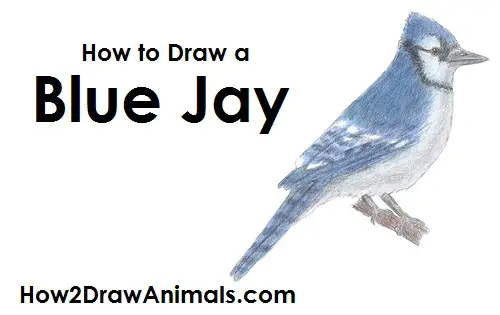
In this free art lesson, you'll learn how to draw a Blue Jay step-by-step.
Stay tuned for more free drawing lessons by:
Liking us on Facebook>>
Subscribing on YouTube.com>>
Following us on Instagram>>
All of the tutorials on How2DrawAnimals.com are good drawing tutorials for beginners and experienced artists alike. The online tutorials are easy to follow; they teach you the how to draw basics while showing you how to draw animals step by step. Each animal has a video drawing tutorial option, as well as step-by-step photos and written text to follow.
RELATED TUTORIALS
 |
 |
 |
To draw this Blue Jay step by step, follow along with the video tutorial below and pause the video after each step to draw at your own pace. You may find it easier to follow the step-by-step drawings below the video. The new lines in each step are shown in red, so you'll know exactly what to draw next. You may want to open the video in a new tab and use both drawing methods. Take your time and draw at your own pace.
Below you can watch a NEW step-by-step video tutorial with NARRATED steps:
The following is a video tutorial where the steps are WRITTEN out within the video:
For the first few steps, don't press down too hard with your pencil. Use light, smooth strokes to begin so that it's easy to erase if you make a mistake.
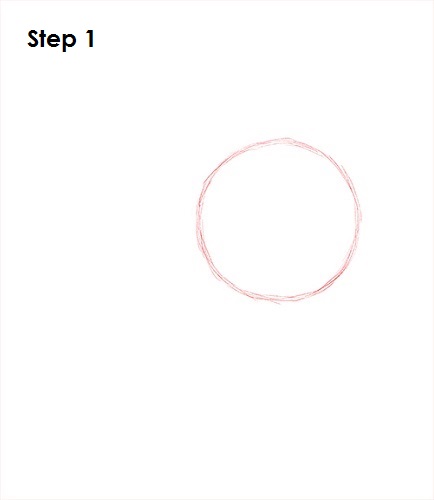
Step 1: Draw a circle as a guide for the top part of the blue jay's body. The circle doesn't have to be perfect. It's just a guide. Leave enough room on the top right for the head and on the lower left for the tail.
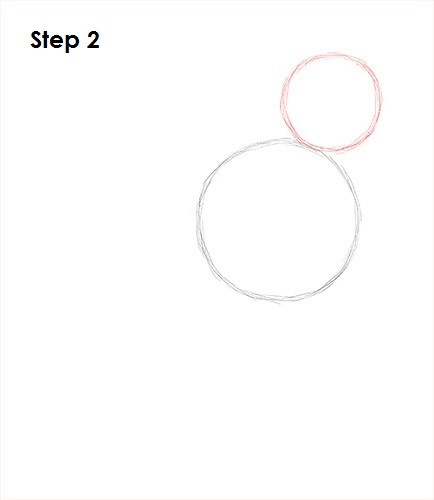
Step 2: Draw another circle on the top right side of the body as a guide for the blue jay's head. This circle should be about a third the size of the first one. The edges of the two circles should touch.
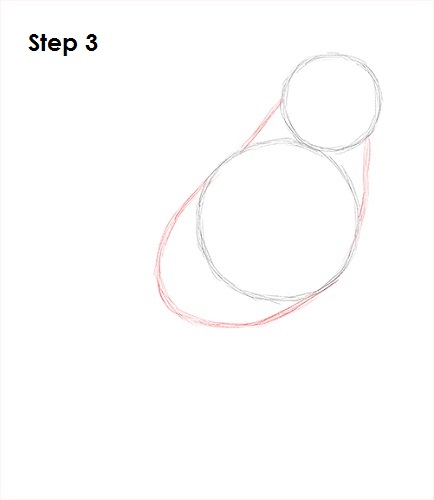
Step 3: Add a few more lines to complete the guide for the blue jay's body. A couple of lines at the top form the neck. An arc on the lower left side forms the second half of the blue jay's body.
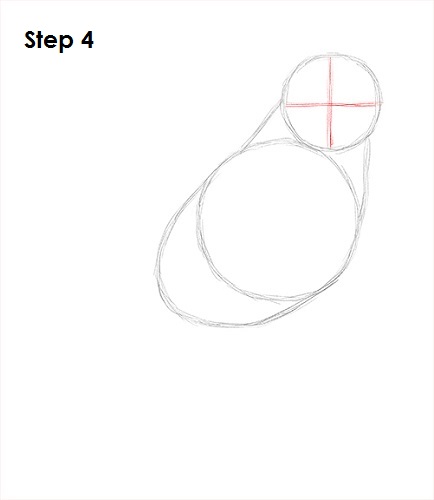
Step 4: Inside the small circle, draw two intersecting lines. These lines will help you place the blue jay's facial features later.
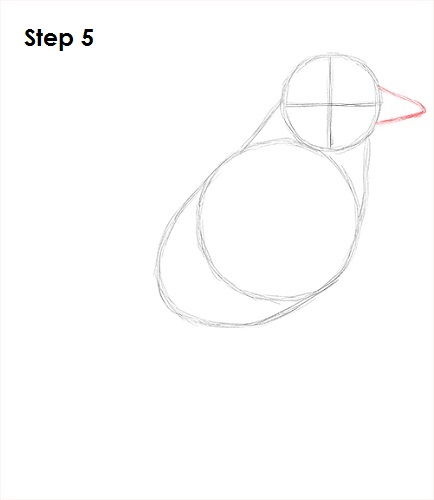
Step 5: Draw a triangle-like shape on the right side of the head as a guide for the blue jay's beak.
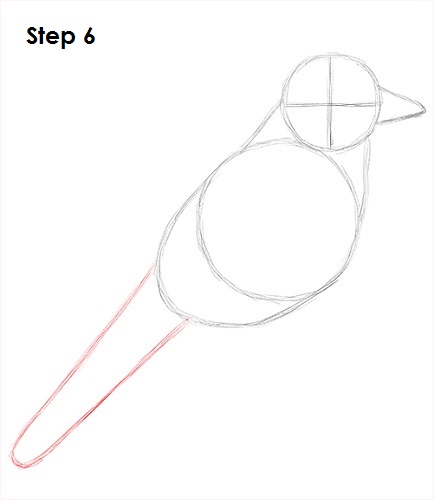
Step 6: Draw a long, narrow arc on the lower left side of the body as a guide for the tail. The tail should be about the same size as the body, but you can make yours as long or as short as you'd like.
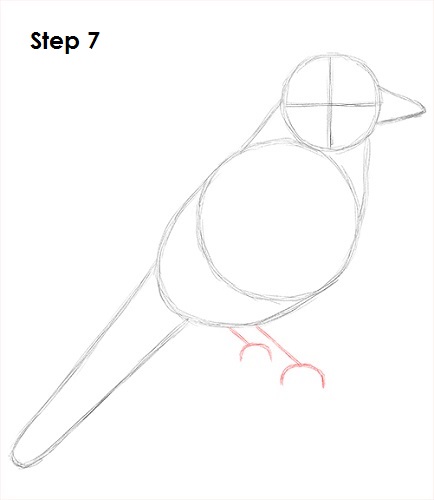
Step 7: Add a few lines under the blue jay's body as guides for the feet.
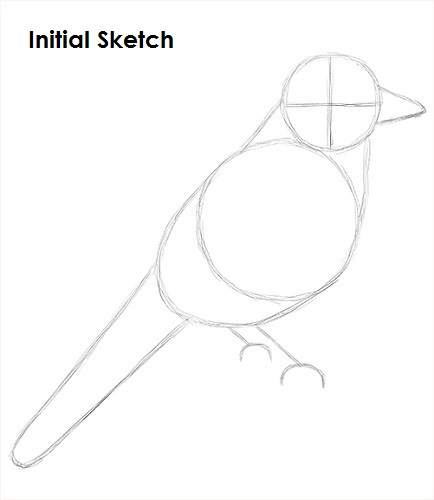
That's it for the initial sketch! From this point on, press harder with your pencil to get a more defined sketch.
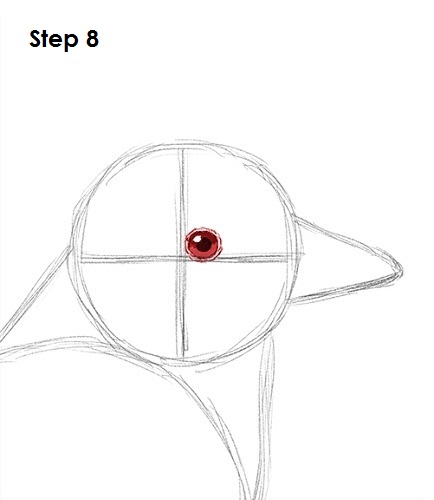
Step 8: Draw the blue jay's eye inside the head as a circle. Use the lines as guides for placement. Draw a tiny circle inside the eye, off to the side to represent glare. In the middle of the eye, draw a big dot for the pupil. Shade the rest of the eye using a value that's lighter than the pupil. Add a few lines around the eye for extra detail.
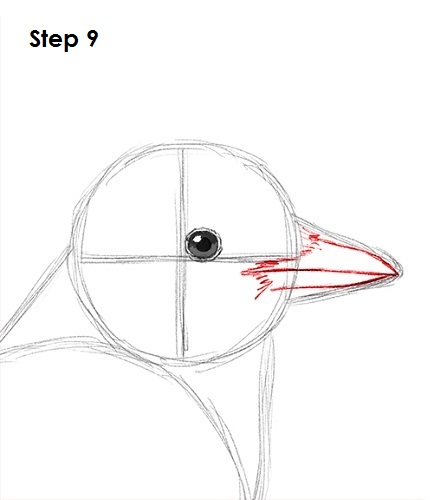
Step 9: Use the triangle-like shape as a guide to draw the blue jay's beak. Darken the top part of the beak as you follow the basic path of the guide. Draw a longer line for it below the mouth. Add another line under the mouth for the bottom part of the beak. Use the initial shape as a guide. Draw the base of the beak on the left side by using quick, short strokes for a feathery texture.
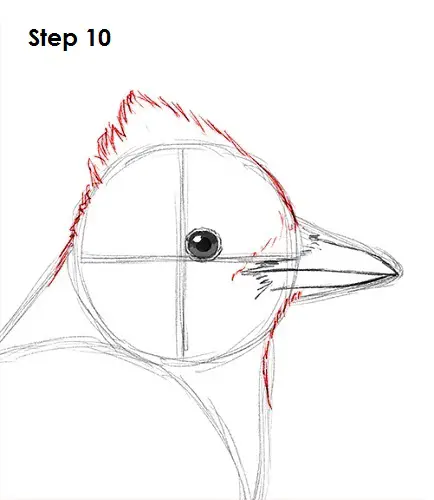
Step 10: Use the initial circle as a guide to draw the blue jay's head. Blue jays have a crest of feathers on their heads. Sketch lightly at first to get the structure right. When you get the shape right, darken the lines using quick, short strokes for a fuzzy texture. Add a few more lines under the blue jay's beak for the neck and on the base of the beak.
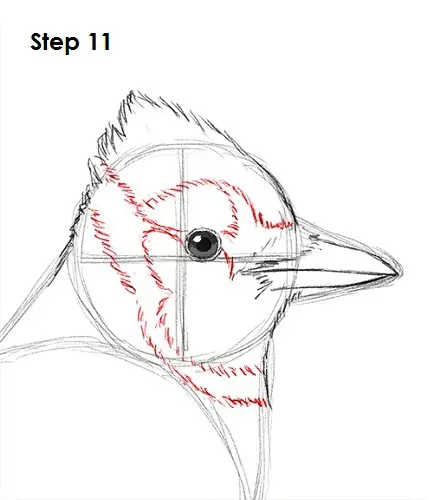
Step 11: Add a few more lines within the blue jay's head for the detail on the face's pattern. Use quick, short strokes as you draw the lines going around the eye. Add a few more lines next to the eye and down toward the neck. These lines will help separate the different colors of the blue jay's head later on.
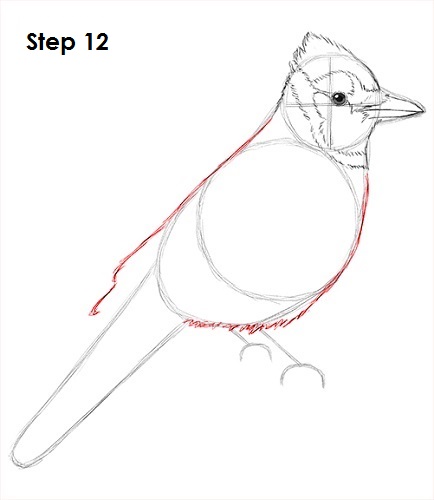
Step 12: Use the initial shapes as guides to draw the outline of the blue jay's body. The line on the left side should stick out to form the tip of the wings. Use quick, short strokes at the bottom for the blue jay's fluffy feathers.
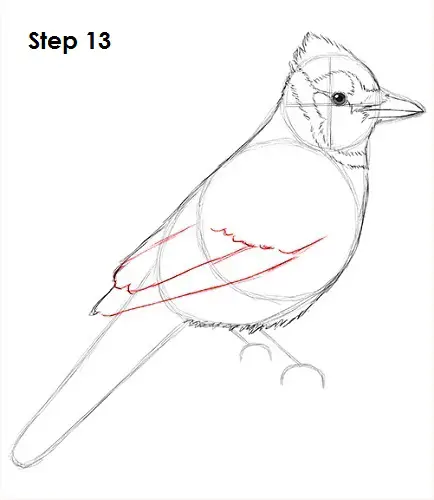
Step 13: Draw the rest of the blue jay's wings within the shape of the body. Draw a couple of diagonal lines coming from the lower, left side toward the inside of the body for the ends of the folded wing. Add a few small curved lines at the top of the wing for the smaller feathers.
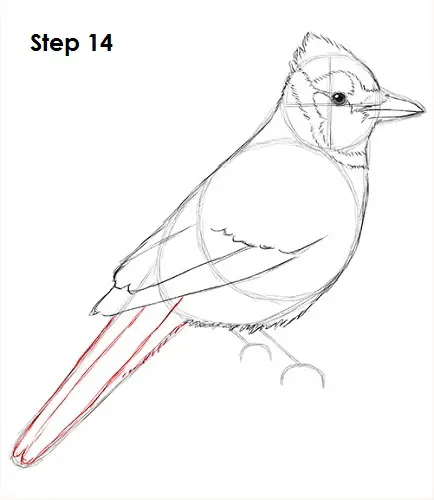
Step 14: Use the long arc as a guide to draw the blue jay's tail. Follow the basic path of the guides as you darken the lines. Add another line in the middle for extra detail.
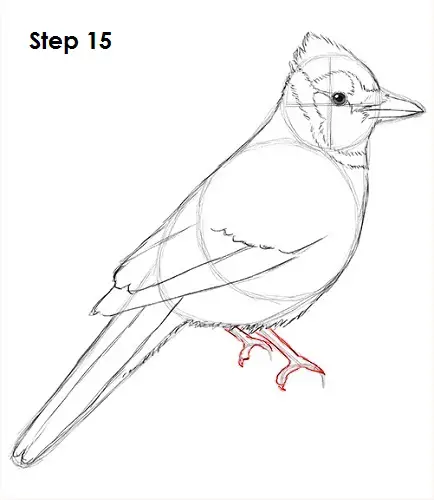
Step 15: Use the lines under the body as guides to draw the blue jay's feet. Follow the basic path of the guides as you darken the lines and make the shapes thicker.
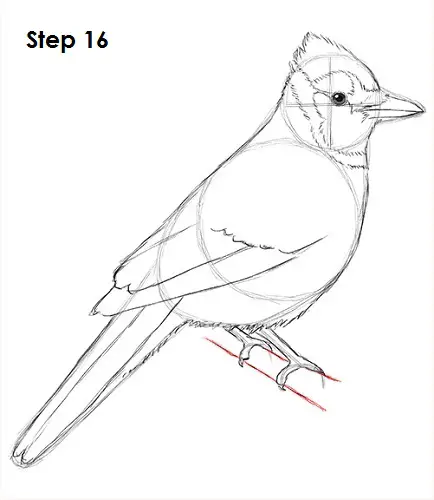
Step 16 (optional): Draw a couple of lines under the feet to give it something to stand on so it doesn't appear to be floating.
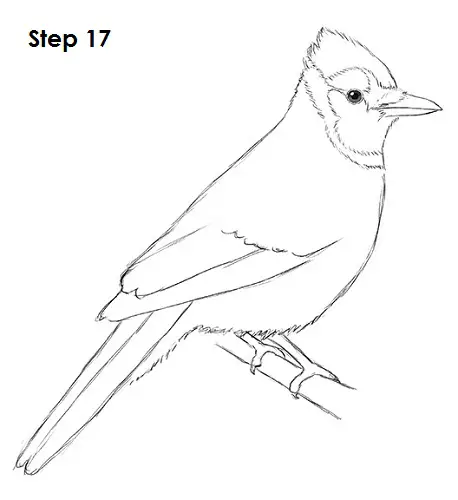
Step 17 (optional): For a cleaner look, erase as much as you can of the initial guide lines. Don't worry about erasing all of the guides. It's okay to leave some behind. Re-draw any of the final sketch lines that you may have accidentally erased.
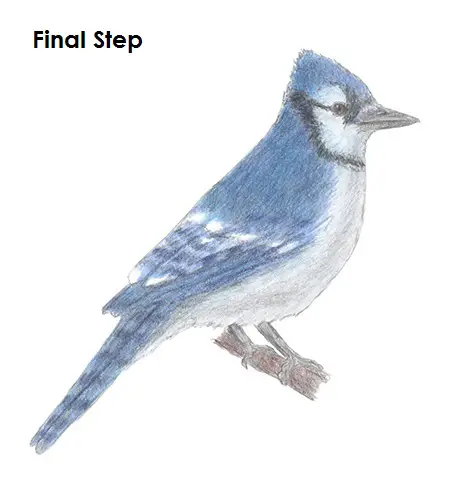
Final Step (optional): Blue jays are colorful, so instead of the usual shading, try coloring your drawing. Using gray, add some shading to give the drawing more dimension and volume. Pick the direction of the light source when shading so that you draw the shadows consistently. Use dark blue to draw the darker tones around the head and tail. Use quick, short strokes as you add the color to the tail for a feathery look. Do the same thing on the wings. Blue jays have a few dark sections on their face pattern. Use black or dark blue to create these shapes. Use the shapes created earlier on the face as guides to block in the black sections. Add a darker tone on the tail and wing pattern and on the beak and feet as well.
Make sure your blue jay is blue! Start adding blue all over the body. Use light blue as you start adding the color to the drawing and work toward a darker shade. Blue jays have a few white spots along their wings, so leave a few sections blank. Continue adding the color throughout the body, this time using a darker tone. Coloring your blue jay can be time-consuming, so be patient and take breaks. Use strokes that go in the general direction of the feathers as you color. Use different shades of blue as you color. press lightly as you color and build up the body gradually using multiple shades of blue. Use a darker shade of blue to get the richer tones on the body. Use this darker shade of blue to outline the individual feathers along the tail and wings. Continue using different shades of blue throughout the body until you get the blend of colors just right. Use some brown on the eye and branch, and gray on the feet and beak. It's a good idea to use reference to get a more accurate color pattern on your drawing. Don't forget to PAUSE after each step to draw at your own pace.
Thanks for visiting! Subscribe to the How2DrawAnimals YouTube Channel for a new tutorial every week.
To learn how to draw popular cartoon characters, visit EasyDrawingTutorials.com.
To learn how to draw Manga, visit How2DrawManga.com.
RELATED TUTORIALS
|
|
|