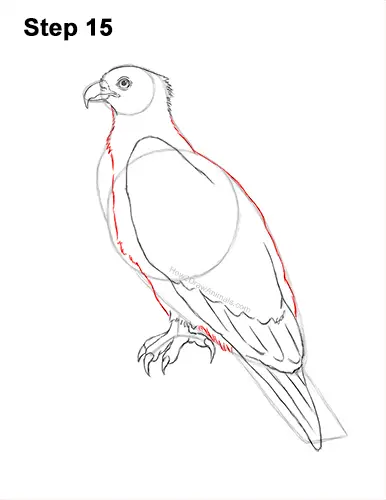
Step 15: Use the main shapes as guides to draw the rest of the body. Darken the outer edges of the initial guides to create the shape of the bird's body. Use a series of short strokes along the guide at the bottom for a feathery texture. Don't overlap the base of the foot at the bottom as you draw the underside of the body. Make the top, left side of the body a little thinner than the initial guide to leave room for the osprey's other wing.
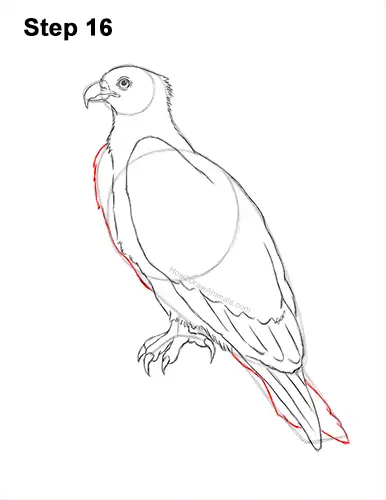
Step 16: Draw a curved line along the path of the guide on the top, left side for the raptor's other folded wing. Use the initial shape on the lower, right side as a guide to draw the visible part of the sea hawk's tail. Draw a few curved lines within the initial shape for the feathers on the tail. Don't overlap the tip of the wing.
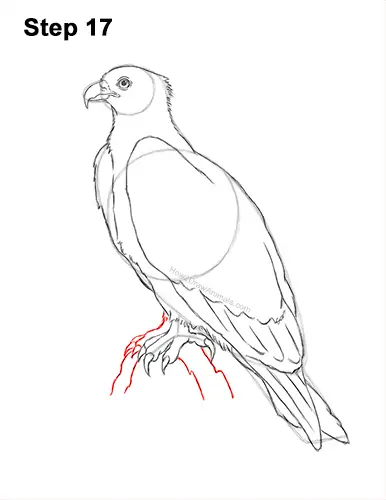
Step 17: Use the first foot as a guide to draw the visible part of the other foot the same way. To the left of the first foot, draw a couple of thin shapes for the toes. At the tip of the toes, draw the talons. Above the foot, draw a few short strokes that connect to the body for the feathery base of the bird's foot. Below the feet, draw a couple of curved lines as a rock for the osprey to stand on.
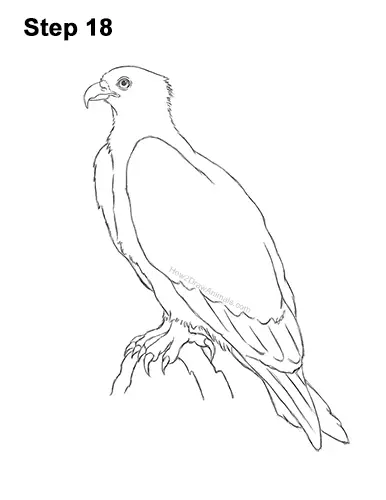
Step 18: For a cleaner look, erase as much as you can of the initial guide lines. Don't worry about erasing all of the guides. It's okay to leave some behind. Re-draw any final sketch lines you may have accidentally erased.
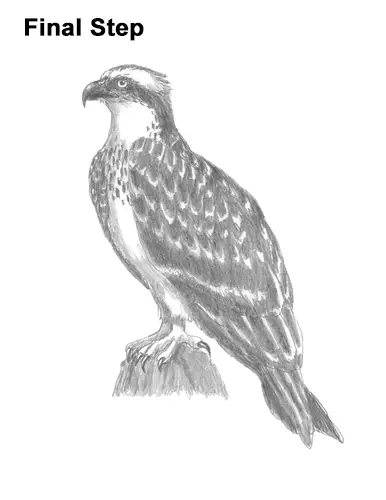
Final Step: Add some shading to your drawing to give your figure the distinct osprey look. Use a dark value to draw a thick band across the head. Don't overlap the eye. The band should stretch to the back of the neck. Use a dark value for the beak too but leave a bit blank at the top to represent shine. Using random small markings, draw the speckled pattern on the right side of the neck. For a more detailed guide on how to shade, check out this tutorial: How to shade.
Shade the osprey's wing on the left but leave a series of small, curved lines blank for the white tips of the feathers. Shade the right side of the body the same way. Use a dark value but leave a few curved lines blank for feathers. Add the same pattern to the wing but make the blank, curved lines longer for bigger feathers. Shade lightly at first so that you get the feathers right. Slowly work your way up to a darker value. Vary the pressure on your pencil to get different degrees of tonal value. Shading can be time-consuming, so be patient and take breaks.
Shade the tip of the osprey's wing and tail but leave the edges of the long feathers inside blank. Shade the talons using a dark value but leave a bit blank on top for shine. Add a light value to the rock. Add random small markings on the bird's chest for the speckled pattern. Add shadows to the white areas by using a light value to give the figure more dimension and volume. It's a good idea to use reference as you draw for an accurate depiction of an osprey. Don't forget to pause the video after each step to draw at your own pace.
Thanks for visiting! Subscribe to the How2DrawAnimals YouTube Channel for a new tutorial every week.
To learn how to draw popular cartoon characters, visit EasyDrawingTutorials.com.
RELATED TUTORIALS
 |
 |
 |


