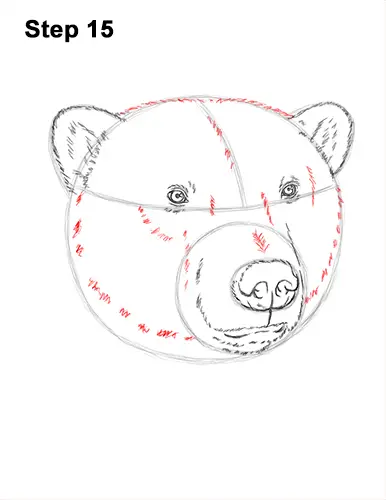
Step 15: Use the big circle as a guide to draw the rest of the polar bear's head. Darken the top edge of the circle but make the shape dip down a bit in the middle. Use short strokes as you follow the basic path of the circle to create the shape of the head. As you darken the right side of the head, make the bottom part narrower than the initial circle.
Draw the right side of the polar bear's head a lot farther in than the edge of the initial circle. Add a few more strokes within the shape of the head for extra detail. Draw a series of lines above the nose to give the bear's muzzle more structure. Add some strokes on the sides of the head to emphasize the bone structure.
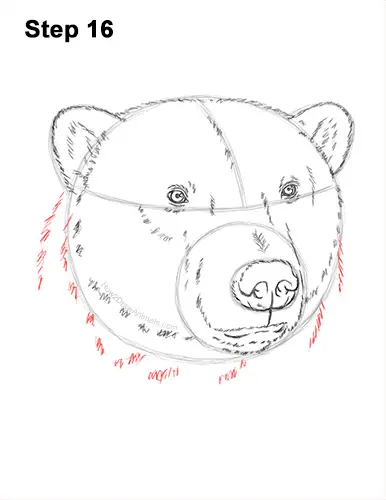
Step 16: Draw a series of strokes along the outer edge of the initial circle for a bit of the polar bear's neck. Create a series of curved shapes made up of short strokes for the fur on the loose skin of the neck. Draw lines made up of strokes that slope to the lower, left side for more fur on the bear's neck.
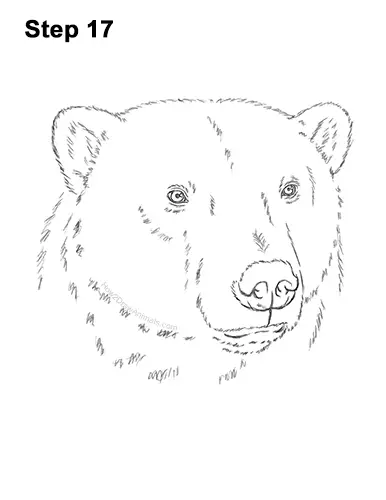
Step 17: For a cleaner look, erase as much as you can of the initial guide lines. Don't worry about erasing all of the guides. It's okay to leave some behind. Re-draw any final sketch lines you may have accidentally erased.
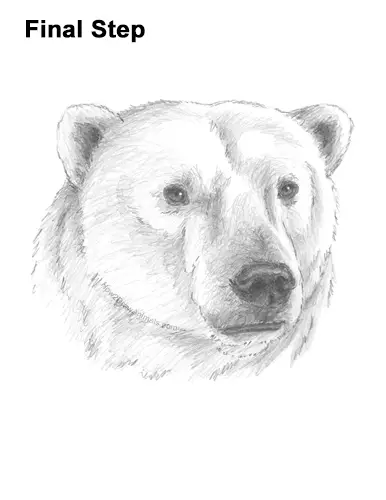
Final Step: Add some shading to your polar bear drawing for extra detail. Use a dark value inside the ears for shadows. Shade the eyes but don't overlap the tiny highlight circles. Make the top part darker than the bottom. When you shade the bear's nose, leave a thin strip at the top blank for shine. Make the inside of the nostrils extra dark. Draw a series of short strokes all over the head to emphasize the fur. For a more detailed guide on how to shade, check out this tutorial: How to shade.
Polar bears are white, so use a light value. Vary the pressure on your pencil to get different degrees of tonal value. Use strokes that go in the general direction of the fur. The strokes should radiate outward from the bear's nose and eyes. Continue to add the fur using short strokes. Slowly add a darker value to the dark areas like the nose and eyes. Add the fur mainly where the shadows are. Pick the direction of the light source so that the shadows are consistent with it. Polar bears are white, so you can stop at any time if you don't want your drawing to have a lot of shading.
Keep the strokes on the polar bear's head light so the fur remains white. Use a dark value for the lips but leave a strip blank for highlight. Shade the head lightly using short strokes until you're happy with the result. Use a darker value for the fur around the nose but don't over-do the shading or you'll end up with a grizzly bear drawing! It's a good idea to use reference as you draw for a more accurate depiction of a polar bear. Don't forget to pause the video after each step to draw at your own pace.
Thanks for visiting! Subscribe to the How2DrawAnimals YouTube Channel for a new tutorial every week.
To learn how to draw popular cartoon characters, visit EasyDrawingTutorials.com.
RELATED TUTORIALS
 |
 |
 |


