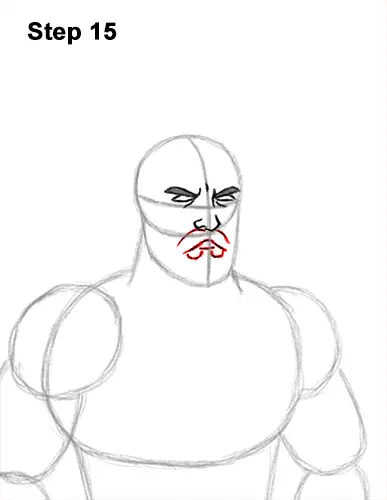
Step 15: Below the nose, on each side, draw a line that curves downward for the top part of the centaur's mustache. The big mustache will be covering the top lip. Add a curved line below the nose for the bottom part of the mustache. Below the thick shape of the mustache, draw a short line for the lower lip. Below the lip, draw a couple of short, U-shaped lines for the first part of the beard.
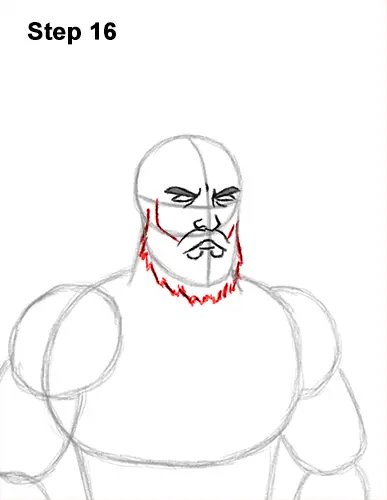
Step 16: To the left of the mustache, draw an angled line for the first part of the beard. Add a shorter line on the right for the other side of the beard. Follow the basic path of the initial U-shaped guide to draw the bottom part of the beard. The shape of the beard consists of a series of jagged, angled lines along the curved path of the guide. You can make the centaur's beard bigger or smaller by moving these lines higher or lower along the curved guide line.
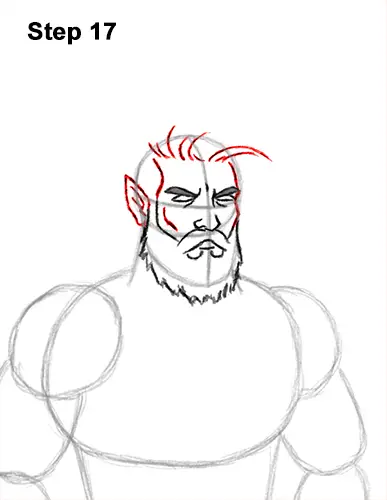
Step 17: Use the initial circle as a guide to draw the rest of the centaur's face. Make the shape of the head thinner. Draw an angled line under the eye on the left for the cheekbone. On the left side, continue drawing the line for the beard upward and curve it for the first part of the hairline.
High above the centaur's eyes, draw a series of lines that curve to the right for the top part of the hair line. The hair will be long and blowing in the wind, so make these lines long across the top of the head. On the left side, draw the ear using a series of curved lines. Centaurs are mythical creatures, so make the top part of the ear pointy. The bottom is curved, and add some lines inside the shape.
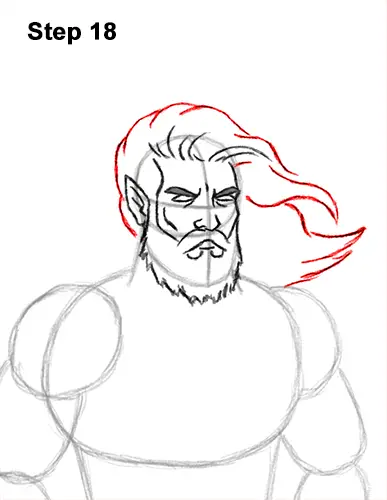
Step 18: Draw a series of long, curved lines around the outside edge of the initial circle for the hair. Sketch lightly as you follow the basic curvature of the initial circle. When you get the lines right, darken them. These curved lines should overlap a bit. They should be closer to the head on the left side than at the top. The hair will be blowing to the right, so draw a series of long, wavy lines on the top, right side of the centaur's head.
Sketch lightly at first so that it's easy to erase if you make a mistake. Darken the lines only when you get them right. On the right-most side, draw a couple of wavy lines that come to a point that curves down. Draw the centaur's hair as big, wavy, chunks like this instead of individual strands. Add a few more tips on the lower, right side and finish the shape of the hair over the shoulder.
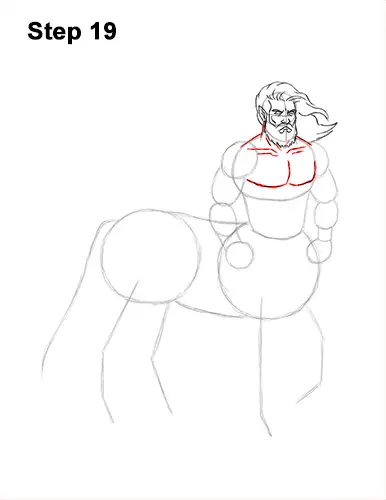
Step 19: Use the oval-like shape under the head as a guide to draw the top part of the torso. Darken the lines for the neck and the top part of the oval for the centaur's trapezius muscles. Below the neck, draw a couple of sloping lines for the collar bones. Within the initial oval-like shape, draw a couple of curved lines for the pectoral muscles. Place the pectoral muscles slightly higher than the lower edge of the initial oval-like shape.


