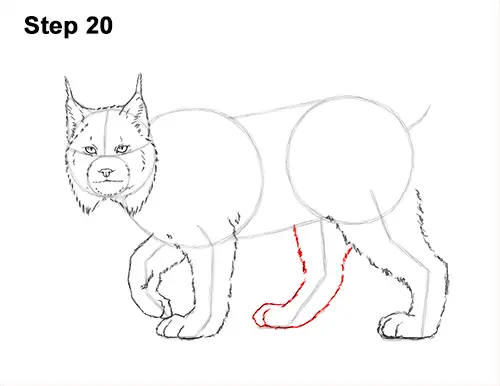
Step 20: Use the last line under the body as a guide to draw the other hind leg the same way. Lightly sketch the shape of the leg around the guide and only darken the lines when you get the shape right. Use short strokes for furry texture. The bottom part of the leg should slope to the left because the lynx is stepping forward. Make the paw big at the bottom and add a short, curved line at the top for the toes.
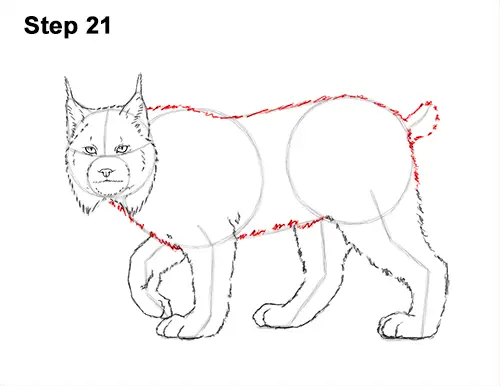
Step 21: Use the remaining lines and shapes as guides to draw the rest of the lynx's body. Darken the outer edges of the guides to create the shape of the body. Use short strokes along the edge of the guides to create a fur-like texture. Use longer strokes along the bottom of the body. The longer the strokes, the shaggier the fur. Draw the shape of the lynx's short, stubby tail using short strokes around the guide line on the top, right side.
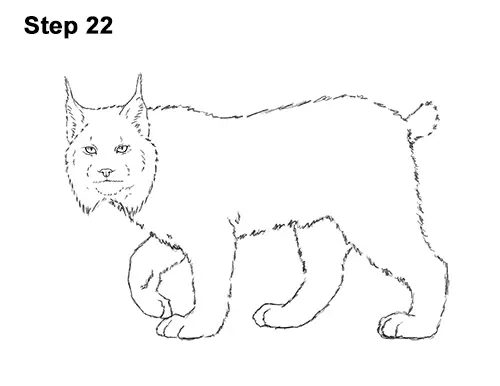
Step 22: For a cleaner look, erase as much as you can of the initial guide lines. Don't worry about erasing all of the guides. It's okay to leave some behind. Re-draw any final sketch lines you may have accidentally erased.
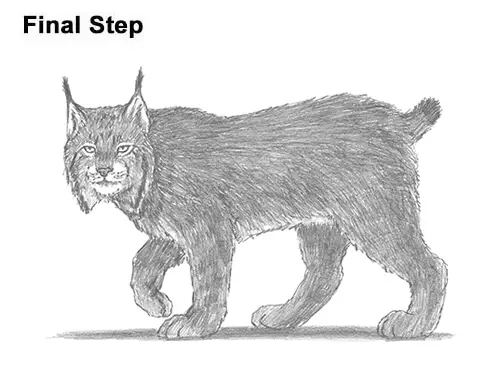
Final Step: Add some shading to your lynx drawing for more detail. Use a dark value for the tufts on the ears. Add a row of dots above the mouth for the base of the whiskers. Using a dark value, draw a streak that runs vertically across each cheek below the eyes. Use short strokes to create a blank section above and below each eye. Use a medium value to shade the rest of the head, except for the muzzle, the inside of the ears and area around the eyes. As you shade, use strokes that go in the general direction of the lynx's fur. For the head, the strokes radiate outward from the middle. Separate each individual stroke a bit so that the white of the paper comes through and emphasizes the fur-like texture. For a more detailed guide on how to shade, check out this tutorial: How to shade.
Use a medium value to shade the lynx's body, except for the underside. Vary the pressure on your pencil to get different degrees of tonal value. The strokes across the body should be horizontal at the top and then gradually turn vertical toward the bottom and on the legs. Shading can be time-consuming, so be patient and take breaks. You can shade different sections of the body at a time to break up the process. Use a dark value to shade in the tip of the tail. Continue adding value until the lynx's entire body is shaded.
Shade lightly at first and gradually build to the level of darkness that you like. The lynx differs from a bobcat in having less distinct spots to no spotting on the coat. So you can add some spots, but make them light. Add a medium value to the nose.
Add a darker value along the bottom part of the lynx's body to create shadows and give the figure more volume and dimension. It's always a good idea to use reference for a more accurate drawing.
Add a cast shadow underneath. This helps ground the lynx so it doesn't appear to be floating. Don't forget to pause the video to draw at your own pace.
Thanks for visiting! Subscribe to the How2DrawAnimals YouTube Channel for a new tutorial every week.
To learn how to draw popular cartoon characters, visit EasyDrawingTutorials.com.
RELATED TUTORIALS
 |
 |
 |


