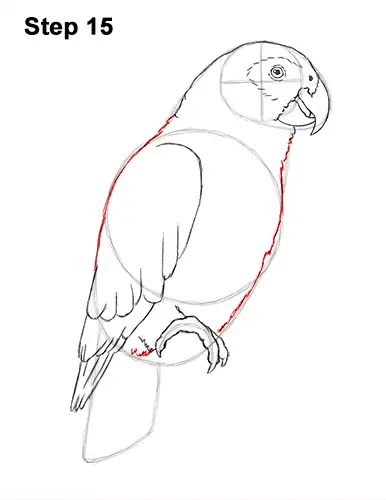
Step 15: Use the first circle and arc as guides to draw the shape of the African grey parrot's body. Simply darken the outer edges of the initial guides to create the shape of the body. Make the shape a bit narrower on the right side and add some short strokes for the bird's feathers. Don't overlap the foot or the wing as you draw the shape of the body.
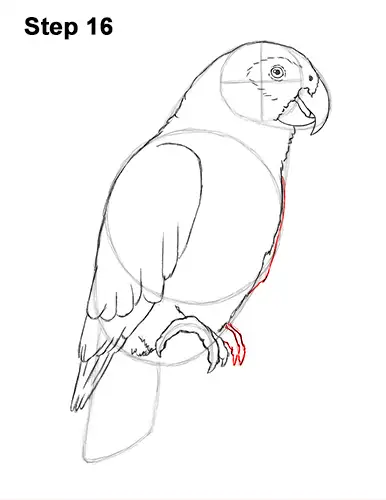
Step 16: Draw the toes of the parrot's other foot to the right of the first foot. Use the first foot as a template to draw these toes. To the right of the body, draw a line for a bit of the bird's other wing peeking from behind the body.
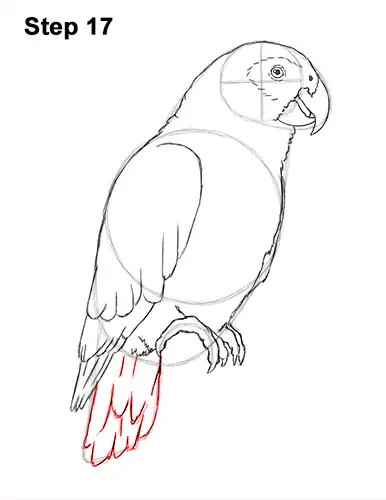
Step 17: Use the shape under the body as a guide to draw the African grey parrot's tail. Draw a series of U-shaped lines along the bottom of the shape for the feathers. Draw a few more U-shaped lines within the shape for more tail feathers. Don't overlap the shape of the wing on the left as you draw the bird's feathers.
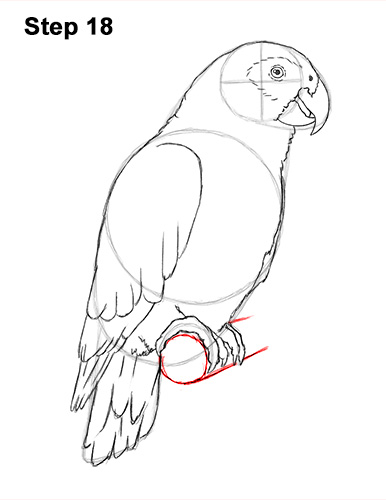
Step 18: Add a perch for the parrot to stand on by first drawing a circle under the feet. Then draw a couple of sloping lines below and above the toes for the sides of the perch.
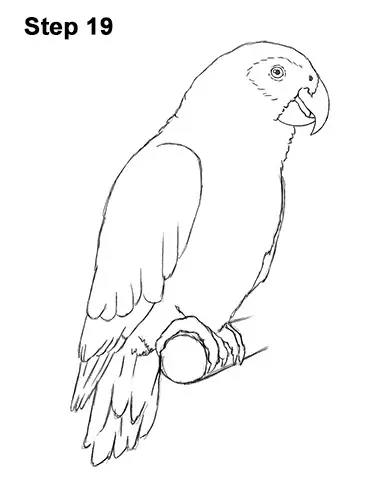
Step 19: For a cleaner look, erase as much as you can of the initial guide lines. Don't worry about erasing all of the guides. It's okay to leave some behind. Re-draw any final sketch lines you may have accidentally erased.
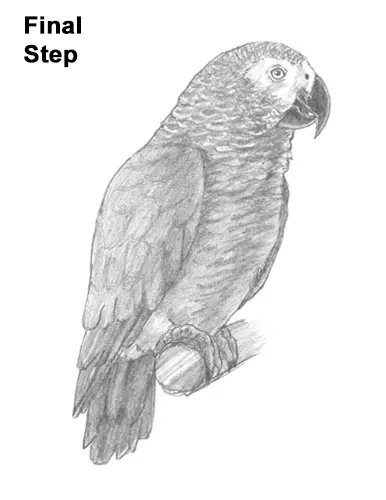
Final Step: Add some shading to your African grey parrot drawing for more detail. Use a dark value for the beak and tongue. Leave a strip along the edge almost blank to represent shine. As their name indicates, African grey parrots are mainly grey! So use a medium value for the rest of the body. For a more detailed guide on how to shade, check out this tutorial: How to shade.
For a feather-like texture, add the value in a series of small arcs that gradually get bigger below the head. Leave the section around the African grey 's eye blank, except for a few shadows. The feathers are a bit lighter along the edges, so make each arc a bit lighter along the edge. Vary the pressure on your pencil to get different degrees of tonal value. For an easier drawing, skip the small arcs and just use a smooth, medium value throughout the bird's whole body.
As you get to the lower half of the body, gradually separate each arc and just use a medium value. Add a slightly darker value near the right edge of the body and wing for shadows. Shading your African grey can be time-consuming, so be patient and take breaks. Add the value lightly at first and gradually build up to the level of darkness you like. Use a smooth medium value for the wing and on top lightly sketch a few U-shaped lines for feathers.
African greys have red tail feathers, so color the tail red if you'd like! Otherwise, just use a slightly darker value. Use a darker value for the feet too. It's always a good idea to use reference as you draw. Don't forget to pause the video after each step to draw at your own pace.
Thanks for visiting! Subscribe to the How2DrawAnimals YouTube Channel for a new tutorial every week.
To learn how to draw popular cartoon characters, visit EasyDrawingTutorials.com.
RELATED TUTORIALS
 |
 |
 |


