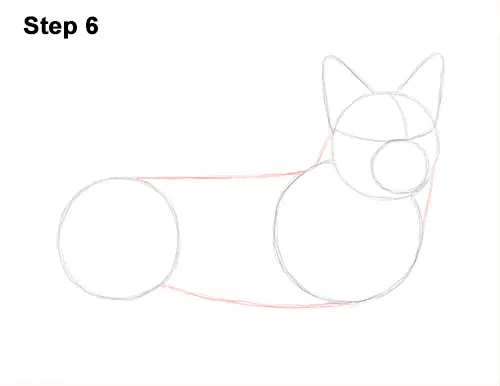
Step 6: Draw a few more lines to complete the guide for the dog's body. First draw two short lines that connect the head to the body for the neck. Then draw two longer lines that connect the body circles to form the rest of the guide for the corgi's torso.
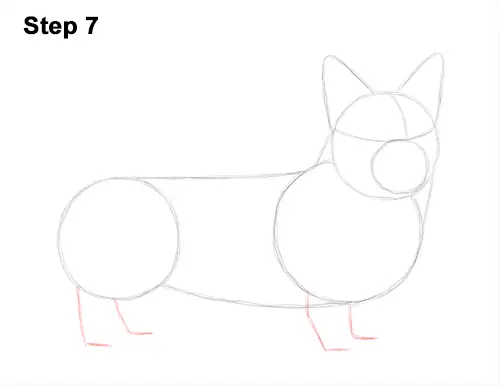
Step 7: Draw four lines under the body (two below each circle) as guides for the legs. Bend the lines to indicate where the joints and the feet will be. Corgis have very short legs, so these guide lines should be short as well.
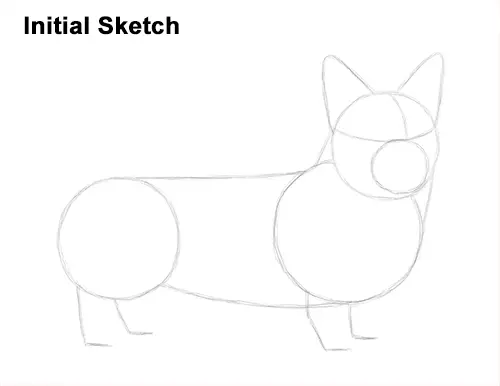
That's it for the initial sketch! From this point on, press harder with your pencil to get a more defined sketch.
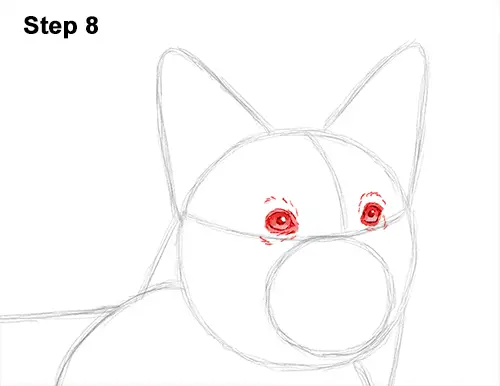
Step 8: Lightly sketch the Pembroke Welsh corgi's eyes inside the head as two small circles. Use the construction lines as guides for the placement of the eyes. When you get the placement of the eyes right, darken the lines. Make the shape a bit wider and pointier on the sides. The resulting shape of the eyes should be similar to little American footballs.
The eye on the right side should be a tiny bit smaller because of the perspective. Draw a tiny circle inside the eye, near the top, to represent glare. Then draw a dot in the middle for the dog's pupil. Do the same for the eye on the right. Draw a tiny circle for glare and a dot in the middle for the pupil. Shade the eyeballs except for the tiny circle that represents glare. As you shade the eyeball, use a value that's slightly lighter than the pupil.
Draw a few lines surrounding the outside of the corgi's eyes for extra detail. Use quick, short strokes as you add the detail to emphasize the texture of the fur. Now using a light value, shade the area between the lines you just created and the eyeballs. Add some more lines farther out around the eyes for more detail on the fur. Use quick, short strokes as you draw the fur to create a fur-like texture.
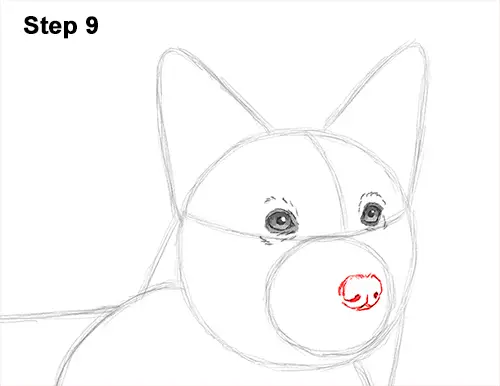
Step 9: Draw the corgi's nose inside the muzzle by first lightly sketching a small oval. Pay attention to the size of the oval in relation to the circle for the muzzle. Place the oval near the right edge of the muzzle. When you get the size and placement right, darken the lines. Use quick, short strokes at the top for the fur.
On either side of the oval, curve the line inward to create the dog's nostrils. Make the line thicker for the nostrils. The bottom of the nose should curve up toward the middle in a small vertical line. Darken the bottom edge of the oval as well to finish the shape of the nose.


