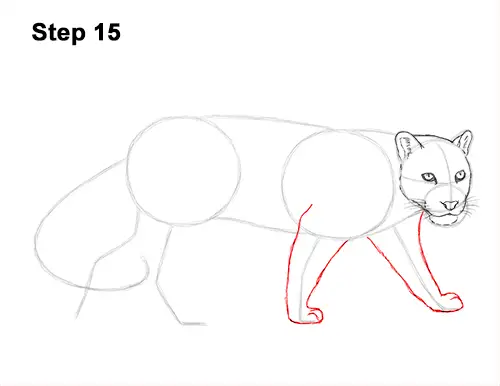
Step 15: Use the lines on the right side of the body as guides to draw the clouded leopard's front legs. Lightly sketch the shape of the leg as you follow the path of the guide line. The leg should be thicker at the top than the bottom. When you get the structure of the leg right, darken the lines. Draw a couple of short, curved lines at the tip of the foot for the toes.
Use the line on the right as a guide to draw the front leg on the other side of the body. Follow the path of the initial guide and only darken the lines when you get the leg's structure right. This leg should have a more diagonal orientation since the clouded leopard is stepping forward.
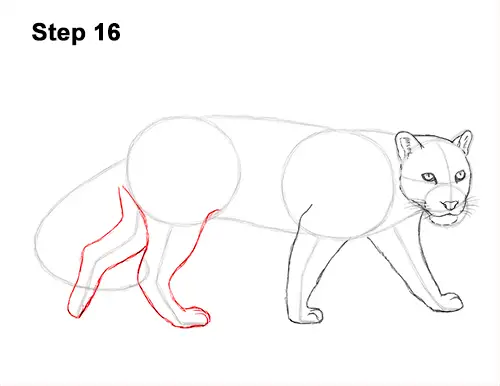
Step 16: Use the lines to the left as guides to draw the clouded leopard's hind legs the same way as the front legs. The top part of the leg should be thicker than the bottom. Notice how the leg bends backward near the middle. Remember to first sketch the shape of the leg lightly as you follow the guide. Darken the lines only when you get the structure right.
The hind legs should be a bit longer than the front legs. Add a couple of short curved lines at the tip of the foot for the toes. Use the last line on the left as a guide to draw the hind leg on the other side the same way. Because the clouded leopard is stepping forward, the tip of the foot should point down, and the individual toes won't be visible.
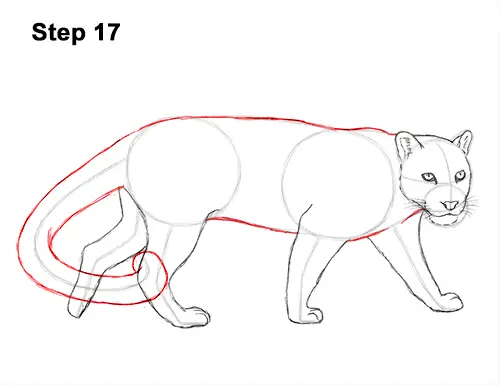
Step 17: Use the remaining lines as guides to draw the rest of the clouded leopard's body and tail. Simply follow the basic outer path of the initial guides and darken the lines to create the shape of the body. Clouded leopards have relatively smooth coats, so use smooth lines as you draw the shape of the body instead of the usual quick, short strokes.
To draw the tail, follow the path of the guide line but make the shape thicker. Part of the tail is in front of the hind legs, so it's okay to overlap the lines. Clouded leopards have very long tails in relation to their bodies, so don't draw it short.
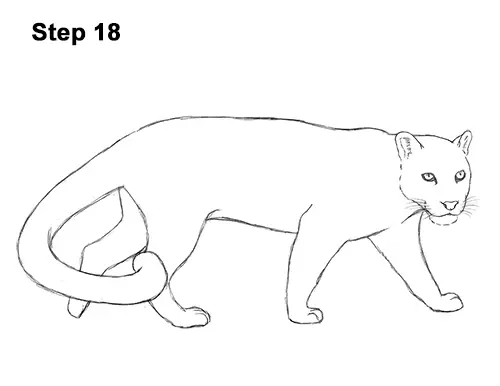
Step 18: For a cleaner look, erase as much as you can of the initial guide lines. Don't worry about erasing all of the guides. It's okay to leave some behind. Re-draw any final sketch lines that you may have accidentally erased.
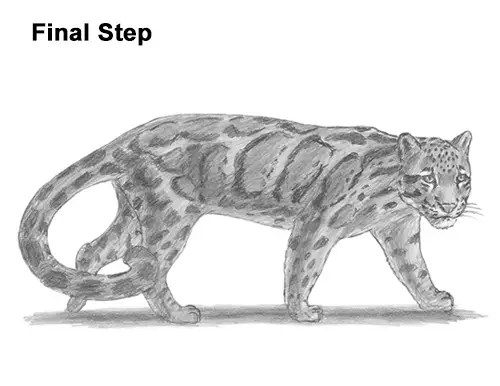
Final Step: Something's missing. The clouded pattern of the coat! Add the distinct pattern all over the clouded leopard's body. Draw a bunch of tiny dots on the top part of the head and muzzle. Add some thick, dark stripes on the sides of the face and next to the eyes. Now start drawing the cloud-like shapes all over the back using thick, dark lines. The shape of these "clouds" should basically be wavy, slanted ovals that are made up of broken thick lines.
Add a few thick lines on the neck and across the top of the back. Lightly sketch the basic outline of the "clouds" at first and when you're happy with them, darken them using thick lines. Adding the coat pattern can be very time- consuming, so be patient and take breaks.
The pattern on the tail consists of bigger blotch-like spots. Continue adding these spots of different sizes all over the clouded leopard's legs. Add a few smaller spots inside the "clouds" too. Continue adding these spots of different sizes all over the legs. Add a few smaller spots inside the "clouds" too.
Add a medium value to the inside of the "cloud" shapes and the clouded leopard's head. Leave a space around the eyes and the front part of the muzzle blank. The value that you use inside the "clouds" should be lighter than the outlines and the spots. Add a lighter value to the space between the spots and "clouds." The outline of the "clouds" and the spots should be a dark value. The inside of the "clouds" should be medium, and everything else should be light.
You can add even more value throughout your clouded leopard drawing to give it more dimension and volume. Use a value that's a bit darker than the inside of the "clouds" but not as dark as the spots for the shadows. Pick the direction of the light source when shading so that the shadows are consistent with it.
Add a cast shadow underneath. This helps ground the clouded leopard so it doesn't appear to be floating. Don't forget to pause the "How to Draw a Clouded Leopard" video after each step to draw at your own pace.
Thanks for watching! Subscribe to the How2DrawAnimals YouTube Channel for a new tutorial every Tuesday.
To learn how to draw popular cartoon characters, visit EasyDrawingTutorials.com.


