Page 3 of 3
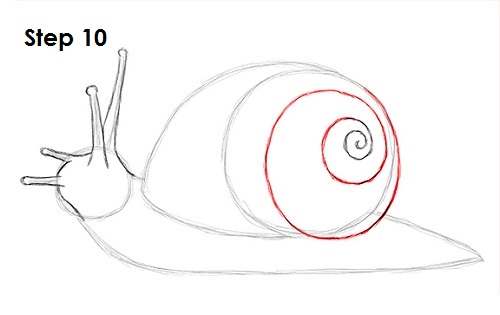
Step 10: Continue drawing the detail on the snail's shell by making the spiral longer. Sketch lightly at first to get the shape of the spiral right. The space between the curved lines should gradually get bigger. The right edge of the spiral extends outside of the original circle for a bigger, rounder shell. Once you get the shape of the spiral right, darken the lines. Drawing the spiral can be tricky, so take your time when you draw it.
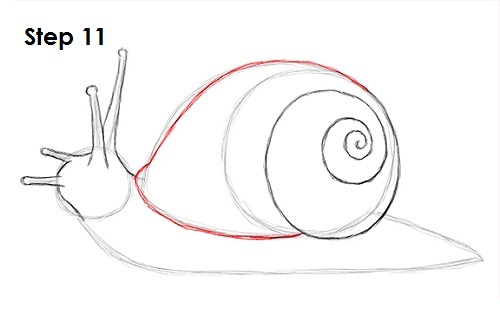
Step 11: Use the curved line on the left as a guide to draw the rest of the snail's shell. Follow the path of the guide as you darken the line and make the left side of the shell a bit thinner.
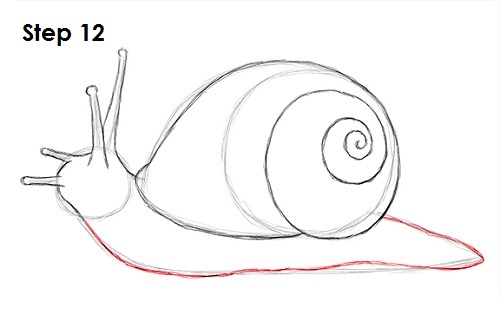
Step 12: Use the line at the bottom as a guide to draw the rest of the soft part of the snail's body. Make the line at the bottom a bit more wavy to give the body a more organic and less static feel.
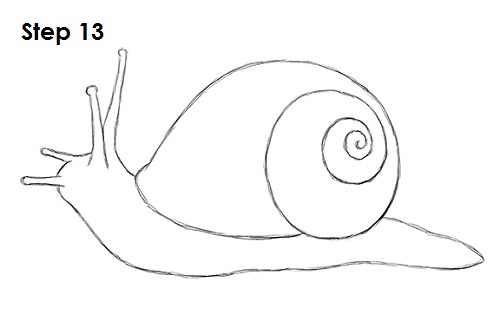
Step 13 (optional): For a cleaner look, erase as much as you can of the initial guide lines. Don't worry about erasing all of the guides. It's okay to leave some behind. Re-draw any of the final sketch lines that you may have accidentally erased.
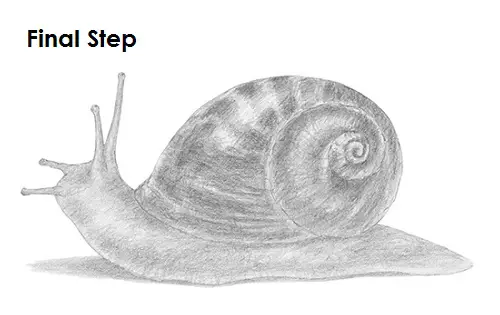
Final Step (optional): You can add more value throughout your snail drawing for extra detail. When you add value to the snail's shell, use a series of lines that go in between the spaces of the spiral. Alternate between a dark and light value as you shade the entire shell. Continue adding lines in the gaps of the spiral to get the pattern on the shell. Use a darker value at the bottom to give the drawing more dimension and volume. Vary the pressure on your pencil to get different degrees of tonal value along the shell to make it shiny. Add the value on the left side of the shell by alternating between dark and light sections to give the shell its pattern. As you draw the light and dark stripes, leave a lighter section near the middle to represent the shell's shine. Adding the value to the snail's shell can be very time-consuming, so be patient and take breaks. For a simpler drawing, you can add a solid value throughout the snail's shell and not worry about the stripy pattern. For an even simpler drawing, skip the shell steps and just draw a slug!
Continue alternating between dark and light values for the stripy pattern. Make sure to have a lighter spot on the shell to represent shine. It's always a good idea to use reference for a more accurate drawing. Snails may be invasive in your garden, but if you have them, study them as you draw. They're slow, so they're good posers! Add more value to the soft part of the snail's body as well. Use a lighter value than what you used for the shell when shading the body. Snails' bodies have a bumpy texture, so don't worry about adding the value too smoothly. Snails are slimy because they're covered in mucus. Make a section on the body lighter to represent the body's slimy shine. Add a darker value near the bottom of the snail's body and under the shell for a more three-dimensional look. Don't forget to pause the "How to Draw a Snail" video to draw at your own pace.
And finally, add a cast shadow underneath. This helps ground the snail so it doesn't appear to be floating.
Thanks for watching! Subscribe to the
How2DrawAnimals YouTube Channel for a new tutorial every Tuesday.
To learn how to draw popular cartoon characters, visit
EasyDrawingTutorials.com.


