







In this free art lesson, you'll learn how to draw a roaring Black Panther step-by-step. All of the tutorials on How2DrawAnimals.com are good for beginners and experienced artists alike. You can follow along with the video or use the step-by-step drawings below to draw this realistic Black Panther.
Subscribe to the How2DrawAnimals YouTube Channel for a new tutorial every week
To learn how to draw popular cartoon characters, visit EasyDrawingTutorials.com.
This page contains Amazon affiliate links. If you choose to purchase through these links, I earn a small commission at no extra cost to you.
Materials You’ll Need
Before starting, gather these basic drawing supplies:
- Pencil (an HB lead pencil is best for light sketches)
- Eraser
- Black ink pen or marker
- Drawing paper
- Colored pencils or markers
Start with Simple Lines and Shapes
For the first few steps, don't press down too hard with your pencil. Use light, smooth strokes to begin.
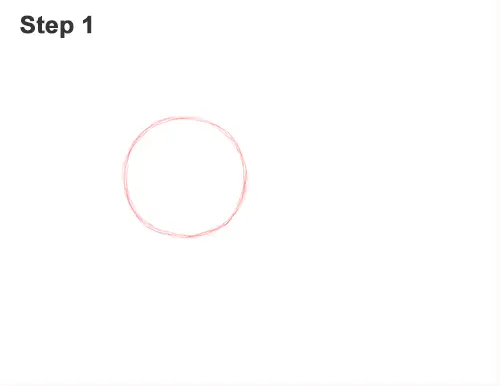
Step 1: Draw a circle as a guide for the black panther's body. First make four small marks to indicate the circle's width and height. Now connect the marks using curved lines to form the rest of the circle. The circle doesn't have to be perfect. If you're struggling drawing the circle, trace the outer rim of a coin, a lid or any other object with a circular edge.
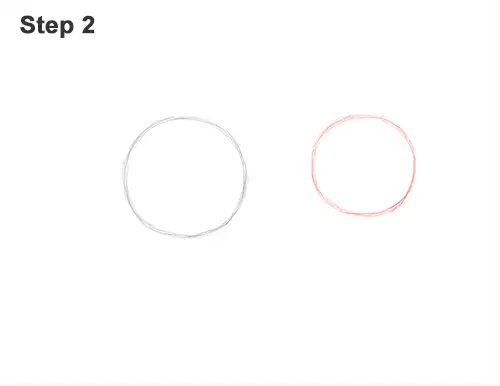
Step 2: Draw another circle on the right the same way as a guide for the back portion of the body. This circle should be a bit bigger than the first, and it should be placed higher up. Don't draw these two circles too far apart, otherwise your panther will be too long.
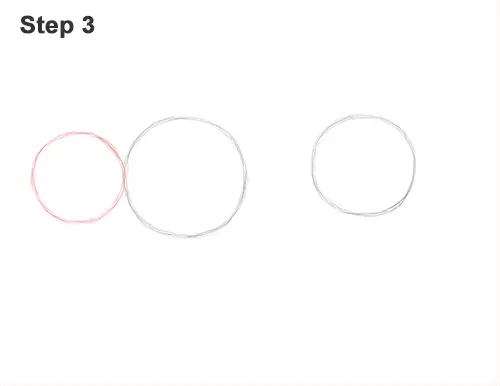
Step 3: Add yet another circle on the left side as a guide for the panther's head. This circle should be about three-fourths the size of the first circle. The edge of this circle should touch the edge of the first circle.
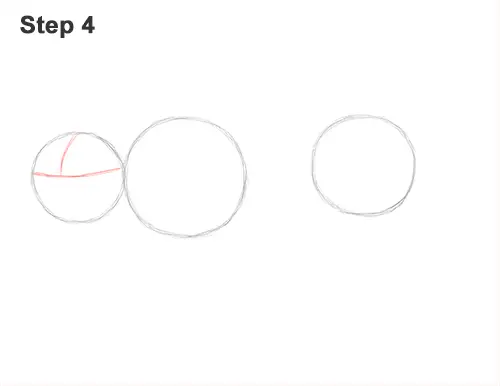
Step 4: Draw a curved horizontal line across the head. This construction line will help you place the black panther's facial features later. Add a curved vertical line on the top, left side of the head for another construction line.
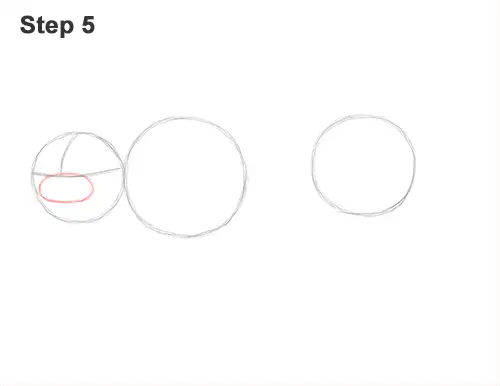
Step 5: Draw a small oval right under the construction lines as a guide for the panther's muzzle. First make a small mark for the bottom of the oval, then connect the mark to the construction line above using curved lines.
Keep Adding Guidelines
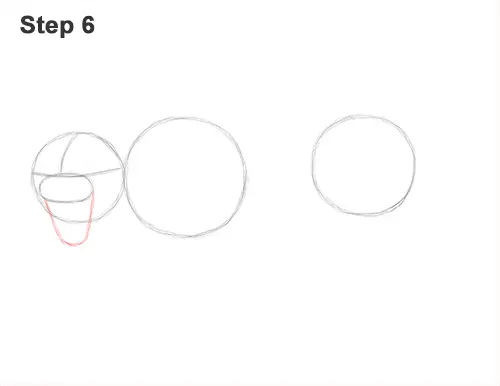
Step 6: Draw a U-shaped line below the oval as a guide for the panther's open mouth. The bottom part of this arc should stick out of the head. The top part should be wider than the bottom.
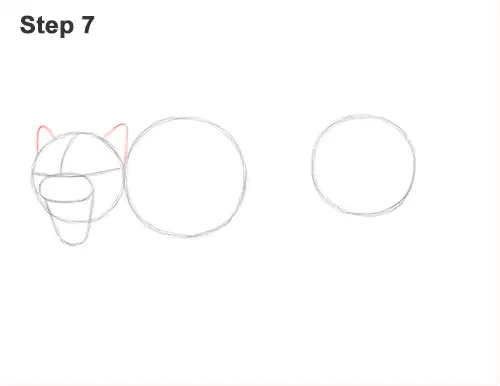
Step 7: On top of the head, draw two small, triangle-like arcs as guides for the black panther's ears.
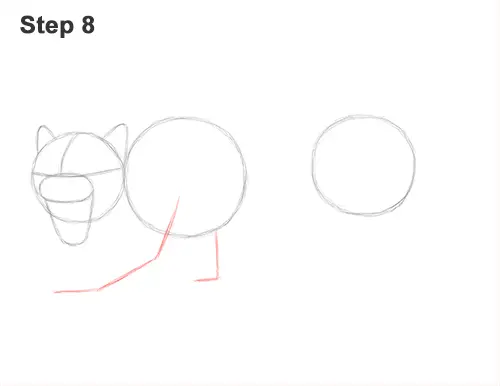
Step 8: Under the first circle, draw a long line as a guide for the panther's first front leg. The line should angle toward the left, and the tip should end up below the head. Add a shorter angled line on the right as a guide for the front leg on the other side of the body.
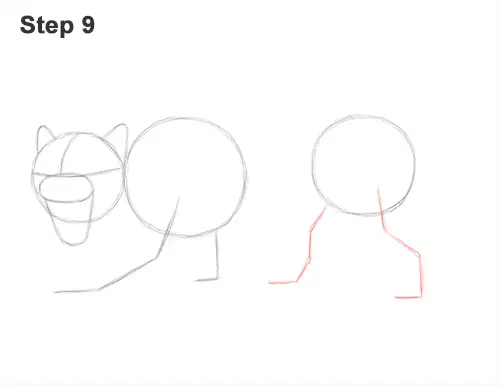
Step 9: Draw two more angled lines under the circle on the right as guides for the hind legs. Pay attention to how these lines bend because it will indicate where the joints will be.
Finish Up the "Skeleton"
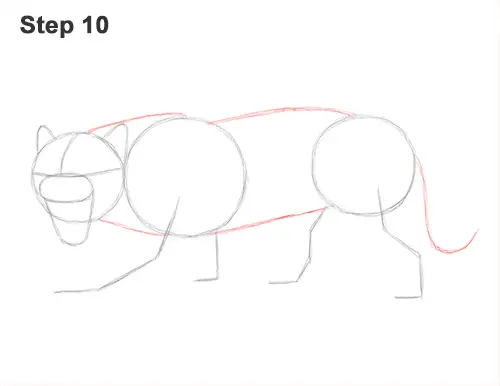
Step 10: Draw two short lines that connect the head to the body to create the neck. Draw two longer lines that connect the circles in the middle to finish the guide for the torso. On the right side, draw a long, curved line, similar in shape to a backward letter J, as a guide for the black panther's tail.
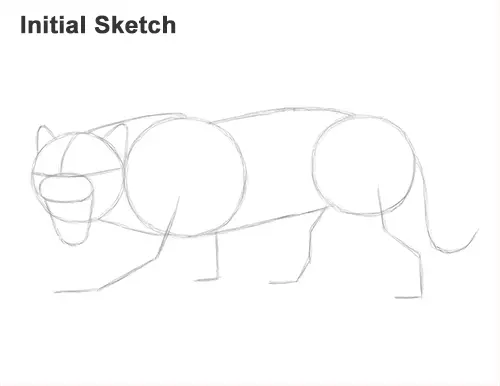
That's it for the initial sketch! From this point on, press harder with your pencil to get a more defined sketch.
Now Add Details
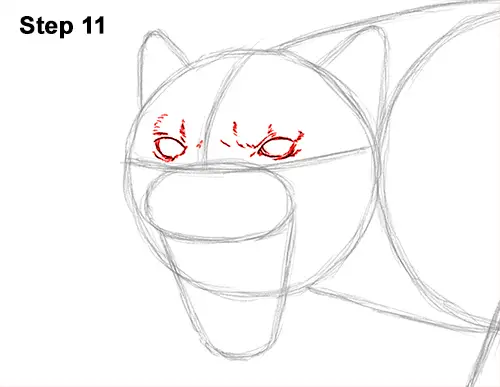
Step 11: Lightly sketch the eyes inside the head as two small ovals. Use the construction lines as guides for the placement of the black panther's eyes. When you get the placement and size of the ovals right, darken the lines. Make the sides of each eye pointy to represent the eyes' corners. Darken the edges of the eyes and make the lines thicker. Add a few strokes around the eyes to emphasize the furrowed brow. Don't worry too much about these lines because they'll be lost in the shading step.
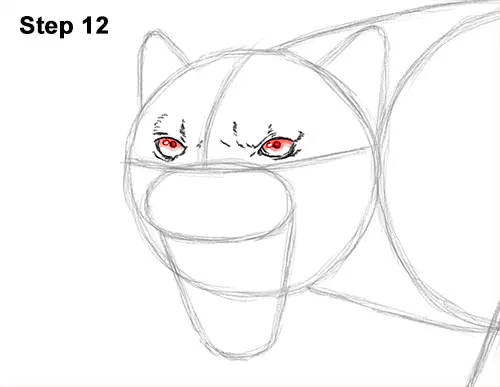
Step 12: Inside each eye, off to the side, draw a tiny circle to represent glare. In the middle of each eye, draw a dot for the pupils. Shade the rest of the eye very lightly as panthers' eyes are very light-colored.
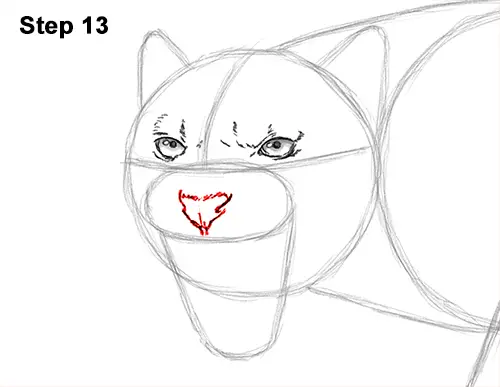
Step 13: Inside the muzzle, lightly sketch a pentagon-like shape for the nose. When you get the shape right, darken the top part using quick, short strokes. Draw a couple of curved lines on the sides for the panther's nostrils. Add a V-shaped line at the bottom with a short line in the middle for the bottom part of the nose.
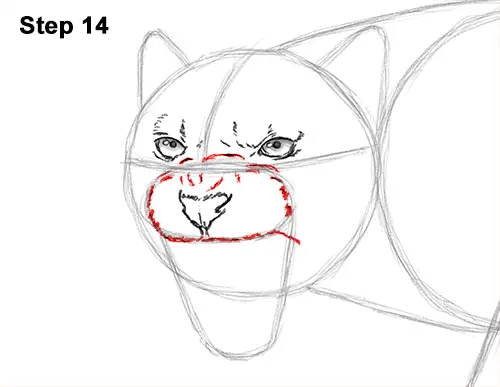
Step 14: Use the initial oval as a guide to create the top part of the muzzle. Follow the basic path of the oval as you use quick, short strokes to create the furry muzzle. Add a few lines above the panther's nose to emphasize the wrinkles on the muzzle.
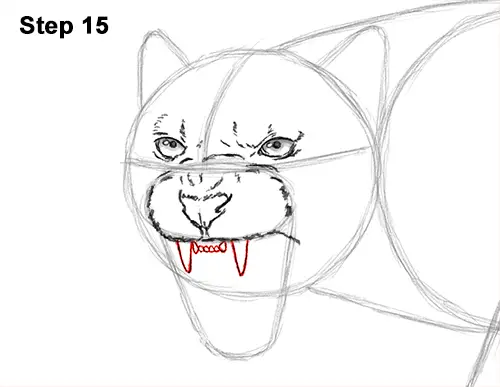
Step 15: Draw a long V-shaped line under the muzzle, on the left side, for the first canine tooth. Add the other canine tooth on the right. Don't draw it too far to the right. In between the black panther's canines, draw a series of square-like incisor teeth.
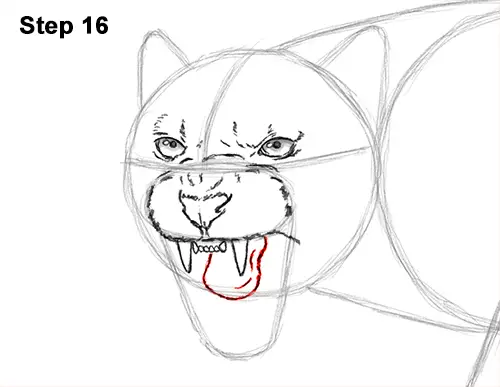
Step 16: Under the teeth, draw a long curved line for the panther's tongue. The shape of the tongue should be similar to a wavy letter U.
Stay Patient and Keep Drawing
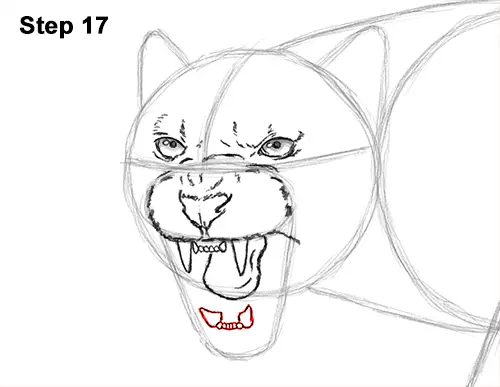
Step 17: Below the tongue, draw a triangle-like shape for the canine on the lower, right. Add the row of lower incisors to the left. Pay attention to the distance between the teeth and lower edge of the guide. Add the other triangle-like canine on the left side.
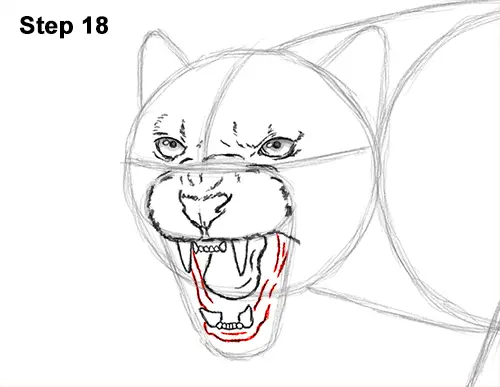
Step 18: Use the initial U-shaped line as a guide to draw the gums around the teeth. Simply draw a few lines that are parallel to the U-shaped guide but that are closer in toward the panther's teeth.
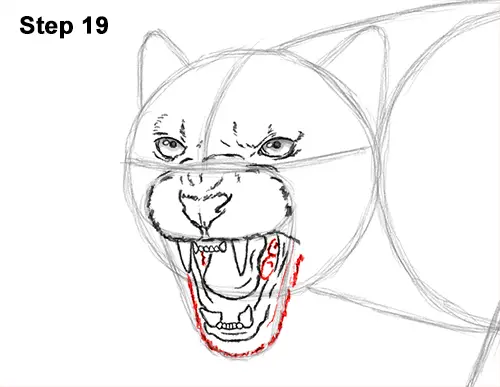
Step 19: Follow the path of the initial U-shaped guide line to draw the panther's lower jaw. Use quick, short strokes along the bottom to represent the furry chin. Add a few curved lines inside the mouth, toward the back, for the visible part of the molars.
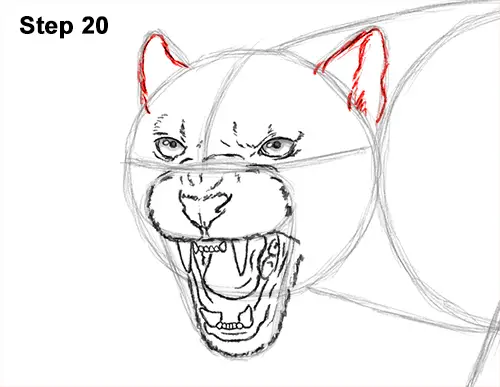
Step 20: Darken the triangle-like arc on the top, left side of the head for the black panther's first ear. Now darken the arc on the right to create the other ear. The ears are flipped back, so draw a line across the middle of the ear on the right for the ear's opening.
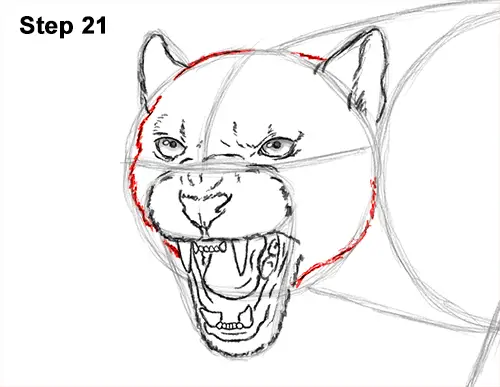
Step 21: Use the main circle as a guide to draw the rest of the head. Follow the basic path of the circle but draw the left side of the head a bit closer to the eye. Make the top part of the head a bit flatter. Add a long, curved line on the lower, right side for the panther's strong jaw.
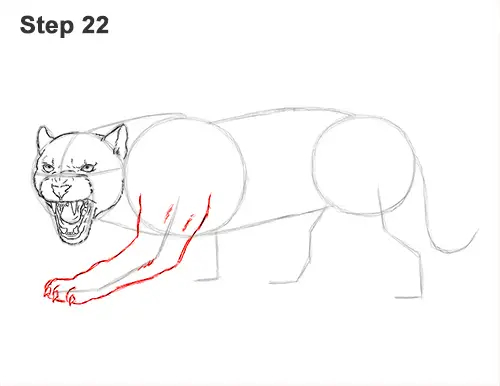
Step 22: Use the leftmost line under the body as a guide to draw the black panther's first front leg. Follow the path of the guide and lightly sketch the shape of the leg around it. The top part of the leg should be thick and gradually get thinner toward the bottom. Use curved lines where the joints are. Curve the overall shape of the leg to conform to the path of the guide line.
When you get the structure of the leg right, darken the lines. At the tip of the foot, draw three curved, spike-like shapes that come to a point for the panther's claws. Add a short, curved line in between each claw to separate the individual toes. Notice the bumps along the shape of the foot and leg that indicate the joints and muscle structure.
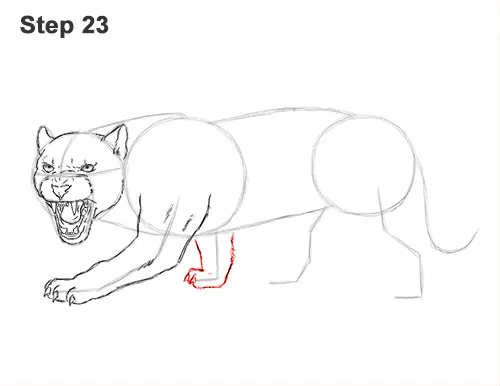
Step 23: Use the angled line on the right as a guide to draw the other front leg the same way. Follow the basic path of the guide as you draw the shape of the leg around it. Most of the leg will be behind the body. Draw the panther's spike-like claws at the tip of the foot. Because of the angle, not all the toes will be visible.
You're Almost There!
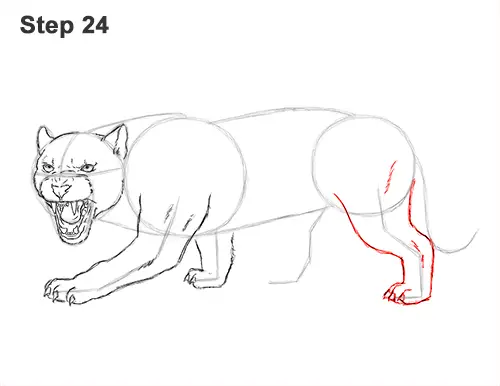
Step 24: Use the line on the far right side as a guide to draw the hind leg that's on this side of the body. Sketch lightly at first to get the shape right. Notice how the shape curves near the middle to create the joint. When you get the structure of the black panther's leg right, darken the lines. Add the sharp claws at the tip of the foot using curved spike-like shapes. The leg is bent, so it shouldn't be too long. The lower part of the leg should be shifted to the right a bit.
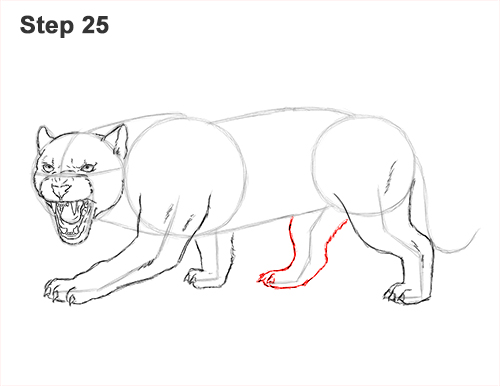
Step 25: Use the last angled line under the black panther's body as a guide to draw the other hind leg. Follow the path of the guide and draw the shape of the leg around it. The top part should be thicker than the bottom. Add the claws at the tip of the foot. Only a couple of claws should be visible from this angle.
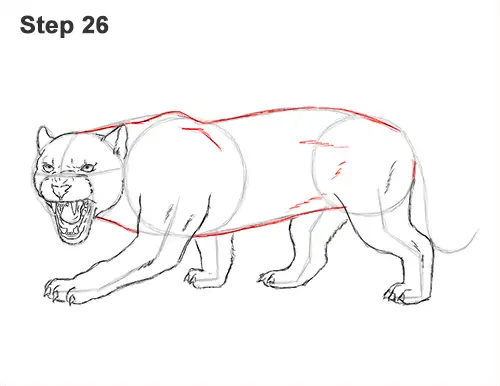
Step 26: Use the remaining lines as guides to draw the rest of the body. Darken the outer edges of the initial guide lines to create the shape of the body. If you made your initial guides too thin or wide, now is the time to correct them to give your panther the proper body shape. If you'd like, you can add a few quick, short strokes within the body for more muscle definition. Add a curved line to the right of the head, close to the top of the body, for the front leg's shoulder blade.
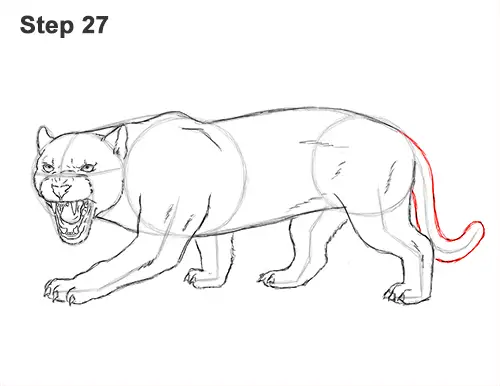
Step 27: Use the long, curved line on the right as a guide to draw the black panther's tail. Follow the path of the guide as you draw the shape of the tail around it. Don't make the tail too thick!
Now It's Time to Shade
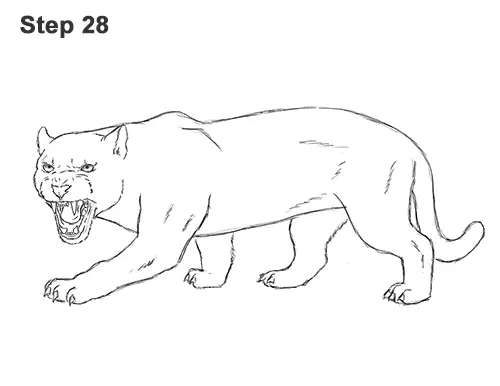
Step 28: For a cleaner look, erase as much as you can of the initial guide lines. Don't worry about erasing all of the guides. It's okay to leave some behind. Re-draw any final sketch lines you may have accidentally erased.
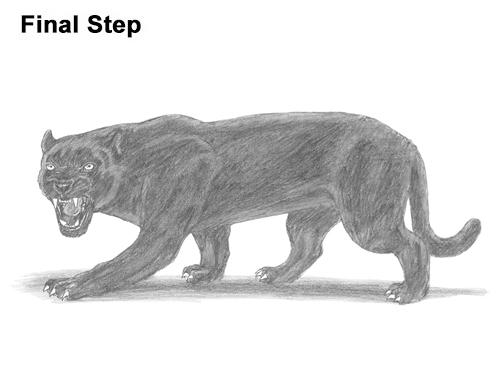
Final Step: Black panthers are black! So shade your entire drawing with your pencil. Shading the panther will be a very long process, so be patient and take breaks. Press down firmly with your pencil to achieve a rich black value. Or you can use a black color pencil too! Black panthers have shiny coats, so leave a few sections blank to represent the sheen on the fur. The shiny sections should be located where the source light would be hitting the body, so mainly at the top.
Use reference to figure out the shiny parts of the black panther's coat or pause the video as you shade to get it right. Try to not vary the pressure on your pencil when applying the dark value. Use an even dark tone throughout the body (except for the shiny parts).
Fill in the blank sections using a medium value so that the shiny sections don't stand out so much. Now do the same thing to the rest of the body. Add the dark value first but leave the sheen blank. Then go back and add a medium value to the sheen.
The difficult part is figuring out where the shiny parts are. The rest is just time-consuming because of the amount of value there is to add. Once you get the sheen right, add a medium value to it so that the value separation isn't too extreme. Try to use smooth strokes. Don't blend or smooth out the graphite with your fingers. It can ruin the drawing. If you want your graphite to be smoother, use a cotton swab over it instead.
Add a cast shadow underneath. This helps ground the black panther so it doesn't appear to be floating.
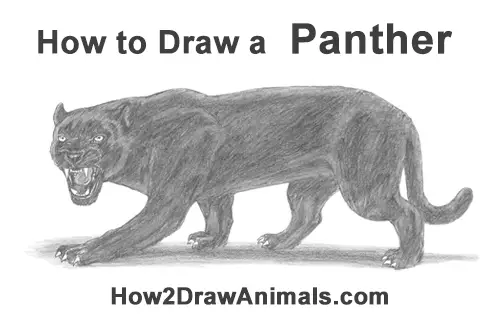
Buy My Step-by-Step Art Books on Amazon!
If you enjoyed drawing with me and want to expand your artistic skills, please consider checking out my step-by-step drawing books on Amazon! My books break down a wide variety of animals into simple geometric shapes, making it easy and fun for artists of any skill level to follow along. Every purchase directly helps support this site so I can keep creating high-quality, free tutorials for the art community.
Click Here to Order Your Copy Today!
Thanks for visiting! Subscribe to the How2DrawAnimals YouTube Channel for a new tutorial every Tuesday.
To learn how to draw popular cartoon characters, visit EasyDrawingTutorials.com.
RELATED TUTORIALS
 |  |  |